Getting an AWS Certificate Manager (ACM) certificate for your subdomain aws.saraswatishrestha.com.np is a straightforward process, especially when you’re going to use Cloudflare for your DNS. Here’s a step-by-step guide:
Key Concept: DNS Validation
ACM needs to verify that you own or control the domain for which you’re requesting a certificate. The most common and recommended method is DNS validation. This involves adding a special CNAME record to your domain’s DNS settings (in your case, in Cloudflare). ACM periodically checks for this record, and once it finds it, it issues the certificate.
Steps to Request an ACM Certificate for aws.saraswatishrestha.com.np:
-
Go to AWS Certificate Manager (ACM):
- Log in to your AWS Management Console.
- Search for “Certificate Manager” in the search bar or navigate to “Security, Identity, & Compliance” and select “Certificate Manager.”
-
Request a Certificate:
- On the ACM dashboard, click the “Request a certificate” button.
-
Choose Certificate Type:
- Select “Request a public certificate.”
- Click “Next.”
-
Add Domain Names:
- In the “Add domain names” section, enter your subdomain:
aws.saraswatishrestha.com.np - Recommendation: If you might have other subdomains under
saraswatishrestha.com.npin the future (likeblog.saraswatishrestha.com.nporapi.saraswatishrestha.com.np), it’s often a good idea to request a wildcard certificate in addition to your specific subdomain. This will coveraws.saraswatishrestha.com.npand any other subdomains. To do this, you would add two domain names:aws.saraswatishrestha.com.np*.saraswatishrestha.com.np(This covers all subdomains, includingapp,www,blog, etc., but not the bare domainsaraswatishrestha.com.np. If you wanted to cover the bare domain, you’d add that as a separate entry too).
- For now, just focus on
aws.saraswatishrestha.com.npif that’s all you need.
- In the “Add domain names” section, enter your subdomain:
-
Select Validation Method:
- Choose DNS validation - recommended. This is generally easier and more automated than email validation, especially when your DNS is managed by Cloudflare.
-
Key Algorithm:
- Leave the “Key algorithm” as RSA 2048 (default) unless you have a specific reason to choose another.
-
Add Tags (Optional):
- You can add tags (key-value pairs) to help organize your resources, e.g.,
Project: MyApp,Environment: Production.
- You can add tags (key-value pairs) to help organize your resources, e.g.,
-
Review and Request:
- Review all the details of your certificate request.
- Click “Confirm and request.”
-
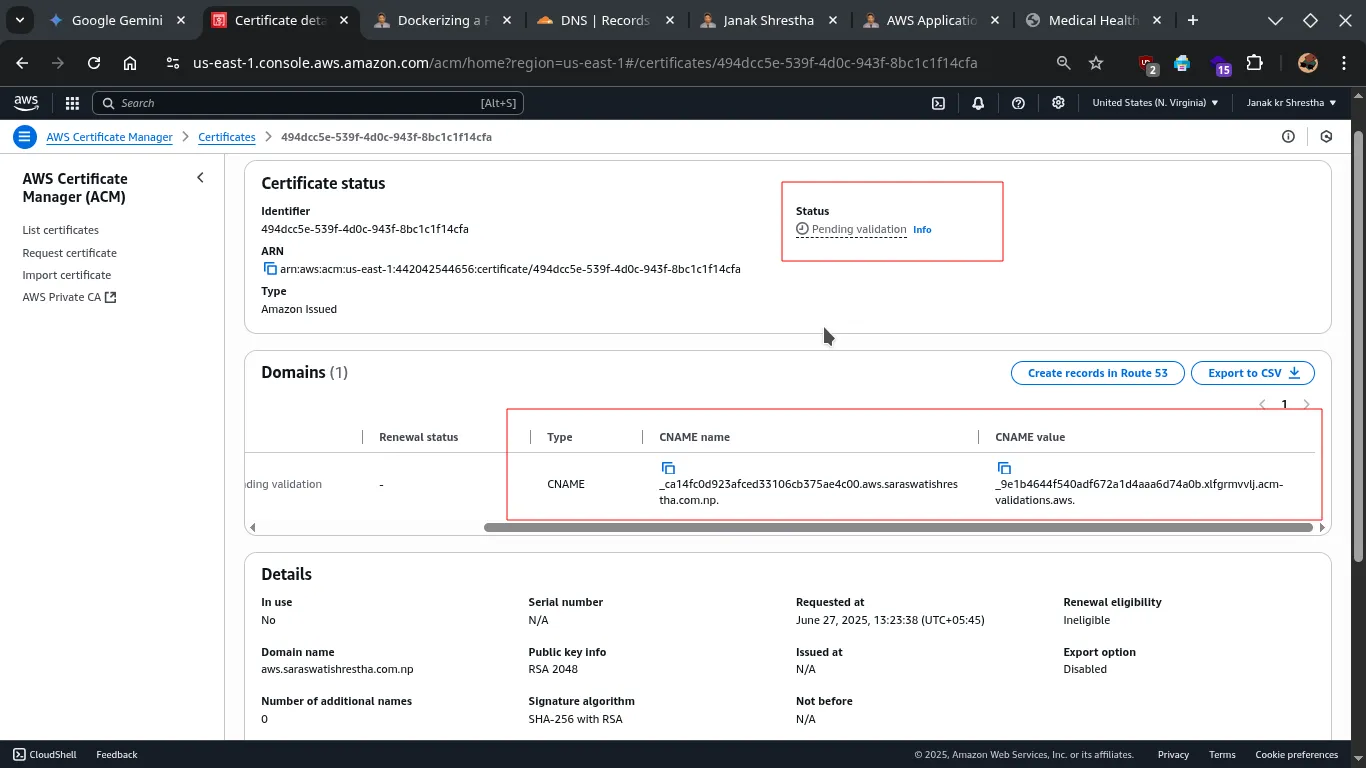
Validate Domain Ownership (Crucial Step):
-
After you request the certificate, its status will be “Pending validation.”
-
Click on the certificate ID to view its details.
-
In the “Domains” section, you will see a CNAME record displayed for
aws.saraswatishrestha.com.np. It will look something like this:- CNAME Name:
_xxxxxxxxxxxxxxxxxxxxxxxxxxxx.aws.saraswatishrestha.com.np(a long string ending with your domain) - CNAME Value:
_yyyyyyyyyyyyyyyyyyyyyyyyyyyy.acm-validations.aws.(another long string pointing to an AWS validation endpoint)
- CNAME Name:
-
Important: Even if you see a “Create records in Route 53” button, DO NOT click it if your DNS is hosted in Cloudflare. You need to manually add these CNAME records to Cloudflare.
-
-
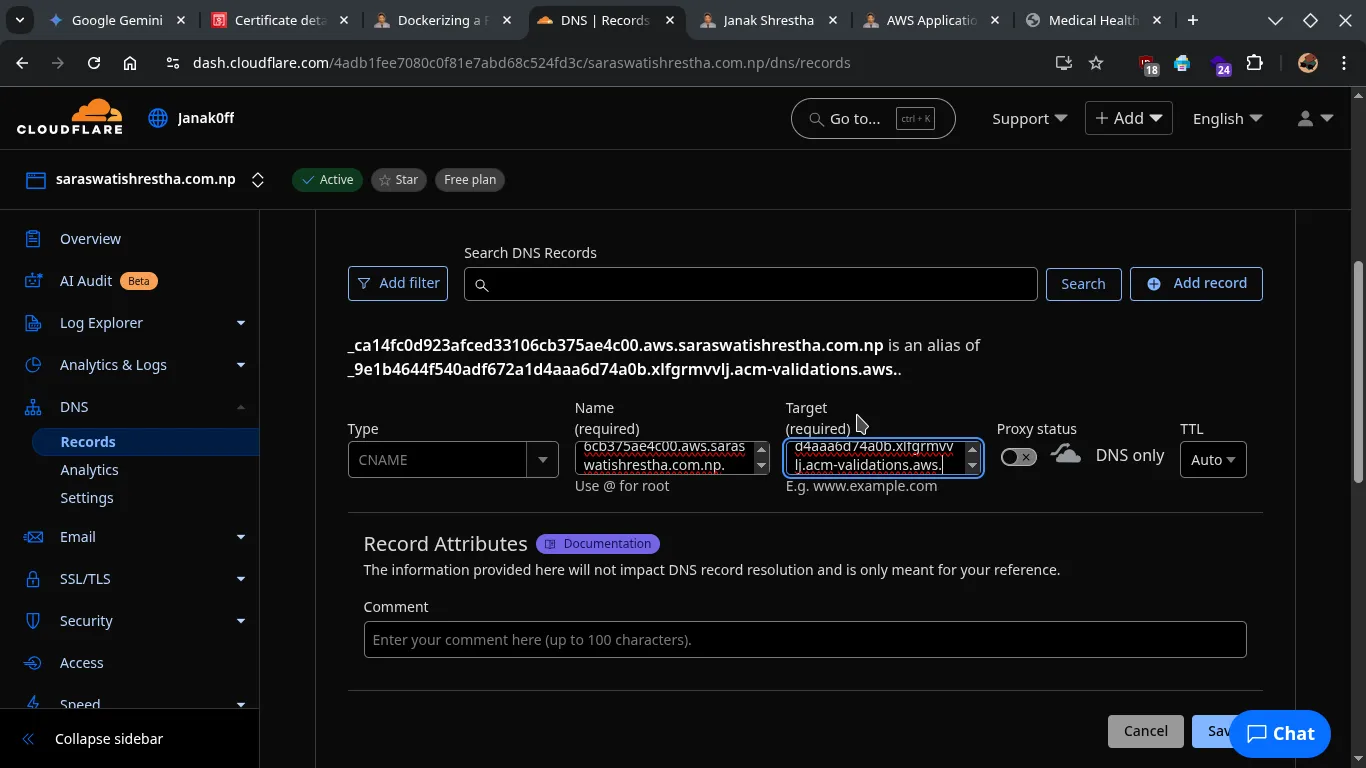
Add CNAME Record in Cloudflare:
-
Open a new browser tab and log in to your Cloudflare dashboard.
-
Select your domain
saraswatishrestha.com.np. -
Go to the DNS section.
-
Click “Add record.”
-
Configure the record as follows:
- Type:
CNAME - Name: Copy the CNAME Name from ACM (e.g.,
_xxxxxxxxxxxxxxxxxxxxxxxxxxxx.app). Cloudflare often auto-appends the domain, so you might just need the_xxxxxxxxxxxxxxxxxxxxxxxxxxxx.apppart. - Target: Copy the CNAME Value from ACM (e.g.,
_yyyyyyyyyyyyyyyyyyyyyyyyyyyy.acm-validations.aws.). - TTL: Leave as “Auto” or 300 seconds.
- Proxy status: Set this to DNS only (grey cloud icon OR off). It’s crucial that this record is not proxied by Cloudflare, as ACM needs to directly verify the CNAME. Once the certificate is issued, you can proxy your main
aws.saraswatishrestha.com.npA/CNAME record in Cloudflare, but the ACM validation CNAME must remain DNS-only.
- Type:
-
Click “Save.”
-
- Wait for Validation:
- Go back to your AWS ACM console.
- The status of your certificate will remain “Pending validation” for some time. ACM constantly polls DNS records. This can take anywhere from a few minutes to an hour (rarely longer, but depends on DNS propagation).
- Refresh the ACM console page periodically.
- Once ACM successfully validates the domain ownership via the CNAME record, the certificate status will change to “Issued.”

After the Certificate is Issued:
Once the certificate is “Issued” in ACM, you can use its ARN (Amazon Resource Name) when configuring the HTTPS listener on your Application Load Balancer (ALB).
Remember to keep the CNAME validation record in Cloudflare. ACM uses it for automatic certificate renewal, so you don’t have to manually renew it every year.