Required:
- You have an AWS account and have already launched an EC2 instance (e.g., Ubuntu).
- Check all these there options while lunching instance.

- You have SSH access to your EC2 instance from your Linux machine.
- You have registered the domain
janakkumarshrestha0.com.npand have control over its DNS records. - 📦 GitHub Repository: 👉 Complete source code and setup files
- 📦 Read Before: 👉 Dockerizing a PHP and MySQL/MariaDB Application with Docker Compose
Step 1: Prepare Your EC2 Instance
SSH into your EC2 instance:
ssh -i /path/to/your/key.pem ec2-user@your_ec2_public_ip
# ssh -i ~/.ssh/janak.pem ubuntu@ec2-35-173-177-9.compute-1.amazonaws.com
1. Update and Install Docker and Docker Compose:
# Update package lists
sudo apt-get update -y

# Install Docker
sudo apt-get install -y docker.io

# Start and enable Docker service
sudo systemctl start docker
sudo systemctl enable docker

# Add your user to the docker group to run docker commands without sudo
sudo usermod -aG docker ubuntu # If your user is 'ubuntu'
# OR sudo usermod -aG docker ec2-user # If your user is 'ec2-user'
# You might need to log out and log back in for the changes to take effect.
# You can test by running `docker ps` after re-logging.

# Install Docker Compose (version 3.8 is quite recent, ensure compatibility)
sudo apt-get install -y docker-compose
# If the above installs an older version, you can install a specific version:
# sudo curl -L "https://github.com/docker/compose/releases/download/v2.24.5/docker-compose-$(uname -s)-$(uname -m)" -o /usr/local/bin/docker-compose
# sudo chmod +x /usr/local/bin/docker-compose
# Check version: docker-compose --version
2. Install Nginx (as a reverse proxy):
sudo apt-get install -y nginx
sudo systemctl start nginx
sudo systemctl enable nginx
Step 2: Transfer Your Application Files
From your local machine, use scp to copy your application directory (containing Dockerfile, docker-compose.yml, .env, elearn.sql, and your PHP code) to your EC2 instance.
Navigate to the root directory of your project application on your local machine.
scp -r -i /path/to/your/key.pem . ubuntu@your_ec2_public_ip:/home/ubuntu/your_app_name
# scp -r -i ~/.ssh/janak.pem . ubuntu@ec2-35-173-177-9.compute-1.amazonaws.com:/home/ubuntu/php-sql-app
Replace your_app_name with a suitable name for your application directory on the EC2 instance.
This will copy all files from your project dir to server.
.: This refers to your current directory (~/Documents/Medical-php-sql-app) on your local machine. You want to copy the contents of this directory.ubuntu@ec2-35-173-177-9.compute-1.amazonaws.com:/home/ubuntu/php-sql-app: This is the destination on your EC2 instance. It specifies the user (ubuntu), the EC2 instance’s hostname, and the full path where you want to copy your app.
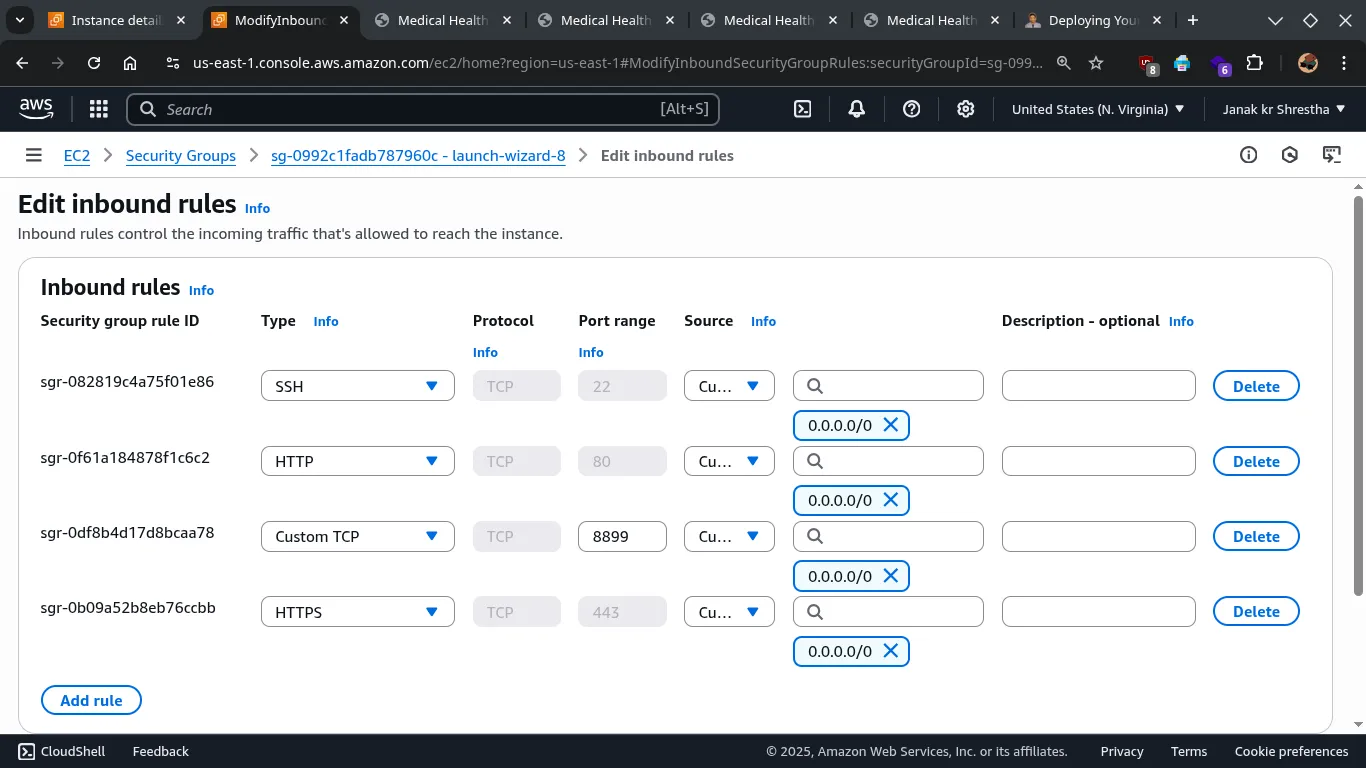
Step 3: Configure Firewall/Security Groups on AWS (already done via GUI)
Your EC2 instance’s security group acts as a virtual firewall. You need to open ports for HTTP (80), HTTPS (443), and potentially your custom app port (8899 if you want direct access, though Nginx will handle 80/443).
- Go to your AWS EC2 Dashboard.
- Navigate to “Instances” and select your running instance.
- In the “Security” tab, click on the Security Group associated with your instance.
- Go to “Inbound rules” and click “Edit inbound rules”.
- Add rules for:
- Type: HTTP, Port range: 80, Source: Anywhere (0.0.0.0/0) or My IP (for more security)
- Type: HTTPS, Port range: 443, Source: Anywhere (0.0.0.0/0)
- (Optional, only if you want direct access to your Docker app without Nginx) Type: Custom TCP, Port range: 8899, Source: Anywhere (0.0.0.0/0)
Step 4: Deploy Your Docker Application
SSH back into your EC2 instance and navigate to your application directory:
ssh -i /path/to/your/key.pem ubuntu@your_ec2_public_ip
# ssh -i ~/.ssh/janak.pem ubuntu@ec2-35-173-177-9.compute-1.amazonaws.com
cd /home/ubuntu/your_app_name
# cd /home/ubuntu/php-sql-app
Start Docker Compose:
docker-compose up -d --buildup: Starts the services.-d: Runs the containers in detached mode (in the background).--build: Rebuilds the images (especially important if you’ve made changes to your Dockerfile or this is the first deployment).
Verify containers:
docker psYou should see both web and db containers running.
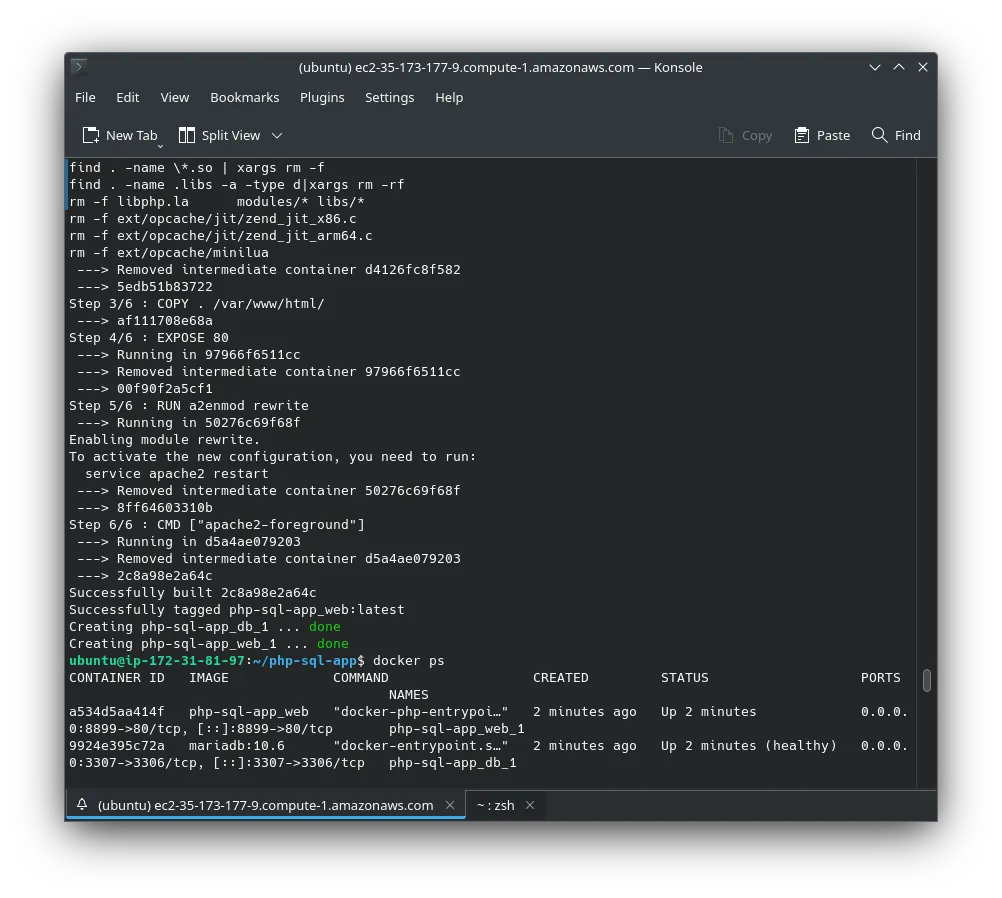
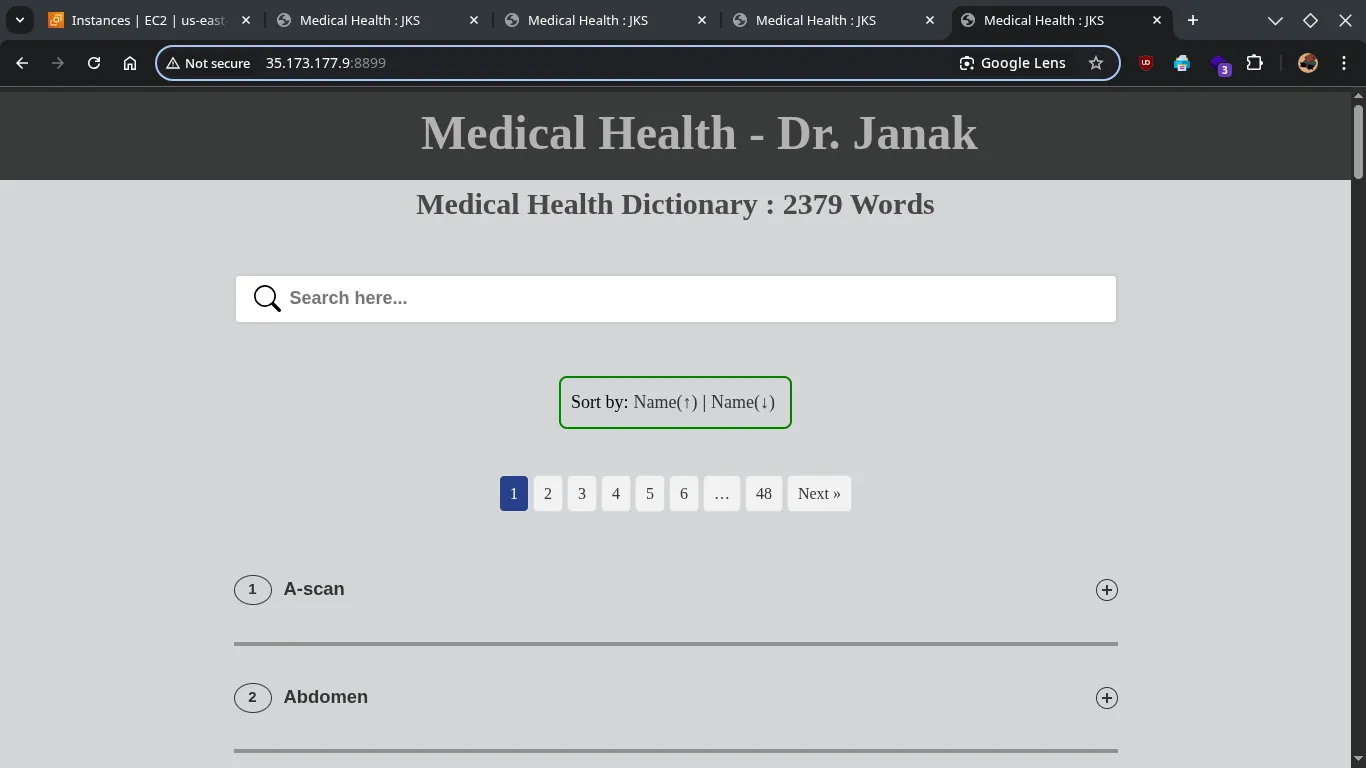
Test the application directly (optional, if port 8899 is open):
Open your web browser and navigate to http://your_ec2_public_ip:8899 OR http://35.173.177.9:8899. You should see your PHP application.
Step 5: Configure Nginx as a Reverse Proxy
We’ll use Nginx to route traffic from your custom domain (medical.janakkumarshrestha0.com.np) to your Dockerized PHP application running on port 8899.
1. Create Nginx configuration file:
sudo nano /etc/nginx/sites-available/medical.janakkumarshrestha0.com.npPaste the following configuration:
server {
    listen 80;
    listen [::]:80;
    server_name medical.janakkumarshrestha0.com.np;

    # Redirect HTTP to HTTPS later (after setting up SSL)
    # return 301 https://$host$request_uri;

    location / {
        proxy_pass http://localhost:8899; # Your Docker web service is exposed on 8899
        proxy_set_header Host $host;
        proxy_set_header X-Real-IP $remote_addr;
        proxy_set_header X-Forwarded-For $proxy_add_x_forwarded_for;
        proxy_set_header X-Forwarded-Proto $scheme;
    }

    # Optional: If you have specific error pages
    # error_page 404 /404.html;
    # location = /404.html {
    #     internal;
    # }

    # error_page 500 502 503 504 /50x.html;
    # location = /50x.html {
    #     internal;
    # }
}
2. Enable the Nginx configuration:
Create a symbolic link to enable the site:
sudo ln -s /etc/nginx/sites-available/medical.janakkumarshrestha0.com.np /etc/nginx/sites-enabled/3. Test Nginx configuration and restart:
sudo nginx -t
sudo systemctl restart nginx
If nginx -t shows no errors, Nginx is configured correctly.
Step 6: Configure DNS Records (cloudflare)
This step is done in your domain registrar’s DNS management (e.g., cloudflare).
- Log in to your domain registrar or DNS management service.
- Locate the DNS settings for
janakkumarshrestha0.com.np. - Add a new A record:
- Type:
A - Name/Host:
medical(ormedical.janakkumarshrestha0.com.npdepending on the provider’s interface) - Value/Points to: Your EC2 instance’s Public IPv4 Address
- TTL: (Time To Live) You can keep the default, or set it lower for faster propagation if you’re testing (e.g., 60-300 seconds).
- Type:
Step 7: Secure Your Application with SSL/TLS (HTTPS)
Using HTTPS is crucial for security and good practice. We’ll use Certbot (Let’s Encrypt) to automatically issue and renew SSL certificates.
1. Install Certbot:
sudo apt-get install -y certbot python3-certbot-nginx2. Obtain and install SSL certificate:
sudo certbot --nginx -d medical.janakkumarshrestha0.com.npFollow the prompts:
- Enter your email address.
- Agree to the terms of service.
- Choose whether to redirect HTTP to HTTPS (Highly Recommended: Select option
2to redirect all HTTP traffic to HTTPS).
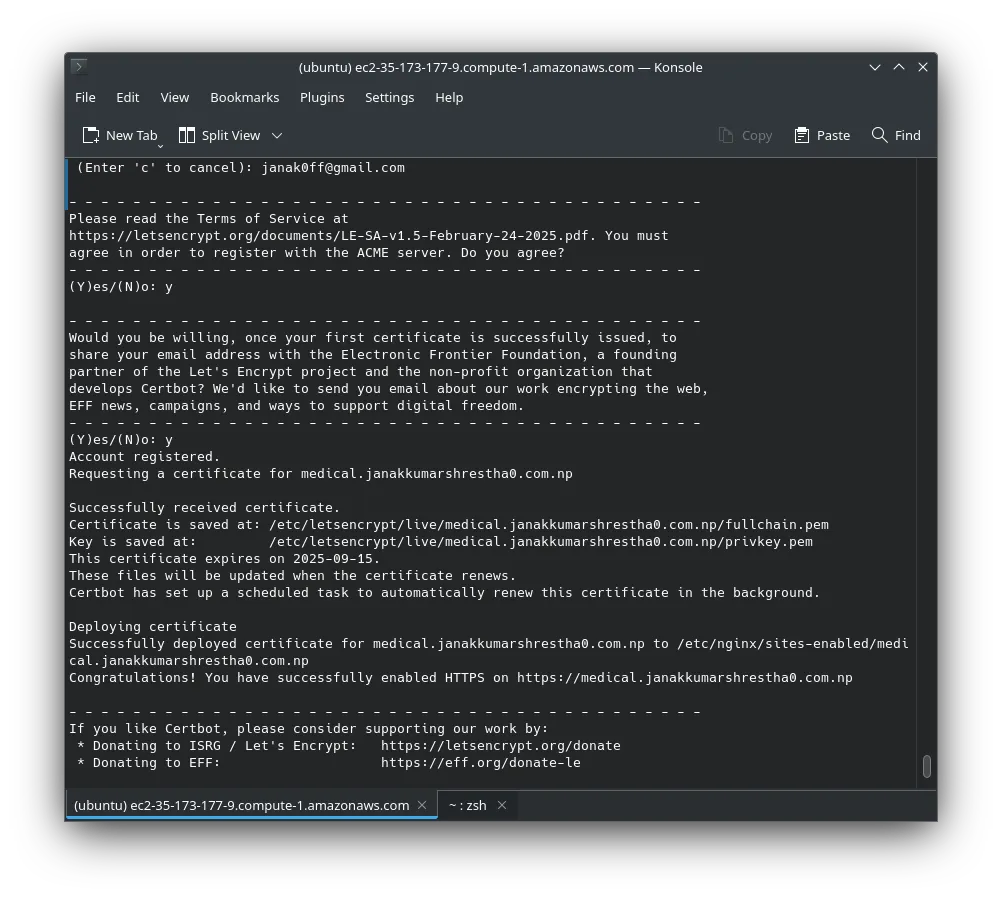
Certbot will automatically modify your Nginx configuration, obtain the certificate, and set up automatic renewal.
Updated nginx config file:
server {
    server_name medical.janakkumarshrestha0.com.np;

    location / {
        proxy_pass http://localhost:8899; # Your Docker web service is exposed on 8899
        proxy_set_header Host $host;
        proxy_set_header X-Real-IP $remote_addr;
        proxy_set_header X-Forwarded-For $proxy_add_x_forwarded_for;
        proxy_set_header X-Forwarded-Proto $scheme;
    }

    listen [::]:443 ssl ipv6only=on; # managed by Certbot
    listen 443 ssl; # managed by Certbot
    ssl_certificate /etc/letsencrypt/live/medical.janakkumarshrestha0.com.np/fullchain.pem; # managed by>
    ssl_certificate_key /etc/letsencrypt/live/medical.janakkumarshrestha0.com.np/privkey.pem; # managed >
    include /etc/letsencrypt/options-ssl-nginx.conf; # managed by Certbot
    ssl_dhparam /etc/letsencrypt/ssl-dhparams.pem; # managed by Certbot

}
server {
    if ($host = medical.janakkumarshrestha0.com.np) {
        return 301 https://$host$request_uri;
    } # managed by Certbot


    listen 80;
    listen [::]:80;
    server_name medical.janakkumarshrestha0.com.np;
    return 404; # managed by Certbot
}
3. Verify SSL certificate:
Open your web browser and navigate to https://medical.janakkumarshrestha0.com.np. You should see your application, and a padlock icon indicating a secure connection.
Updating specific changes files form local to server:
Updating your index.php file with some changes on the AWS server is straightforward when using Docker Compose with mounted volumes.
Since you have this line in your docker-compose.yml:
    volumes:
      - .:/var/www/html/
This means your local project directory (where your index.php is) is directly mounted into the /var/www/html/ directory inside your web Docker container.
This is the beauty of Docker volumes for development!
Here’s how to update the code changes on your AWS server:
-
Save your changes locally:
-
Transfer the updated files to the EC2 instance: Since you’re using a volume, you don’t need to rebuild the Docker image or restart containers. You just need to update the file on the EC2 instance that the Docker container is mounting.
From your local machine, navigate to the root directory of your PHP application (e.g.,
~/Documents/Medical-php-sql-app). Then usescpto copy the updatedindex.phpfile to the same location on your EC2 instance:scp -i ~/.ssh/janak.pem index.php ubuntu@ec2-35-173-177-9.compute-1.amazonaws.com:/home/ubuntu/php-sql-app/index.php- Explanation:
-
scp -i ~/.ssh/janak.pem: Your SSH key for authentication. -
index.php: The specific file you want to copy from your current local directory. -
ubuntu@ec2-35-173-177-9.compute-1.amazonaws.com:/home/ubuntu/php-sql-app/index.php: The destination path on your EC2 instance. This overwrites the existingindex.phpfile at that location.
-
- Explanation:
-
Clear Browser Cache: After transferring the file, hard-refresh your browser (
Ctrl+Shift+RorCmd+Shift+Rusually, or clear browser cache manually) forhttps://medical.janakkumarshrestha0.com.np/index.php. Sometimes browsers cache old data, preventing you from seeing the changes immediately.
Why no Docker commands are needed for code changes:
Because of the volume mount (.:/var/www/html/), any changes you make to the files within /home/ubuntu/php-sql-app on the EC2 instance are immediately reflected inside the Docker container at /var/www/html/. Apache (running inside your PHP container) will automatically serve the updated files without needing a container restart or rebuild.