Practice Project: Automated Weather Data Collection using Shell Scripting and Cron
🎯 Objective
Create an automated ETL (Extract, Transform, Load) process that:
- Extracts weather data daily at noon (local time) for kathmandu, Nepal.
- Transforms the raw data to extract actual and forecasted temperatures.
- Loads the cleaned data into a structured log file.
- Schedules the script to run automatically every day at noon.
🧩 Project Breakdown
1. Data Source
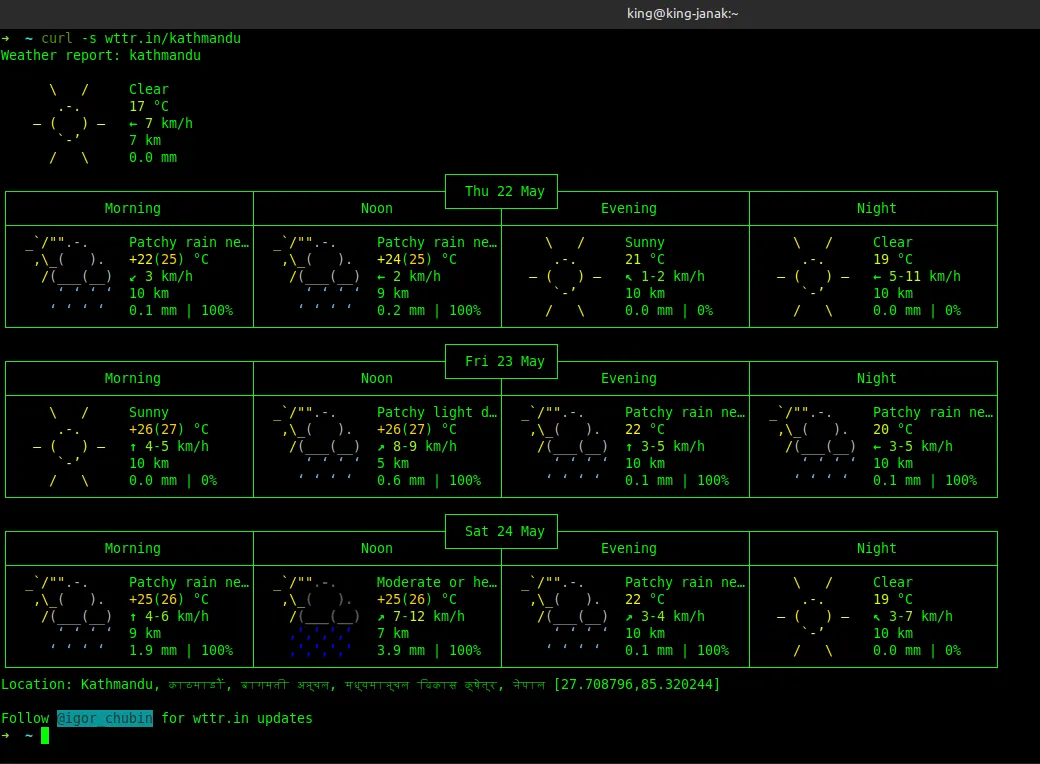
You will use curl to fetch data from wttr.in, a text-based weather service.
Example:
curl wttr.in/kathmanduThis returns current and forecasted weather information in human-readable format.
2. Required Data
Each day at 12:00 PM local time, collect:
| Field | Description |
|---|---|
year | Year of the observation |
month | Month of the observation |
day | Day of the observation |
obs_tmp | Observed temperature (°C) today |
fc_temp | Forecasted temperature (°C) for tomorrow at noon |
3. Desired Output Format
A tab-separated file (weather_report.tsv) with header:
year	month	day	obs_tmp	fc_temp
2023	1	1	10	11
2023	1	2	11	12
...
🛠️ Steps to Complete the Project
✅ Step 1: Download Raw Weather Data
Use curl to get the data:
curl -s wttr.in/kathmandu
-ssuppresses progress output so only the result is shown.
✅ Step 2: Extract Relevant Temperature Data
The output includes multiple lines — you need to parse:
- The current temperature (e.g.,
°C) - The forecast for tomorrow at noon (you may need to look for patterns like
Tomorrow:or use line numbers)
Tips:
- Use
grep,awk, orsedto extract lines containing temperatures. - Use
datecommand to get current date values.
✅ Step 3: Transform and Format the Data
Format the data into five columns:
- Year, month, day (from
date +"%Y %m %d") - Observed temperature (today’s current temp)
- Forecasted temperature (tomorrow’s noon temp)
✅ Step 4: Load Data into a Log File
Append the formatted data to a TSV file:
echo -e "$year\t$month\t$day\t$obs_tmp\t$fc_temp" >> weather_report.tsvEnsure the header is added once at the beginning:
echo -e "year\tmonth\tday\tobs_tmp\tfc_temp" > weather_report.tsv✅ Step 5: Automate Using Cron
Edit your crontab:
crontab -eAdd this line to run the script daily at 12:00 PM:
0 12 * * * /absolute/path/to/your_script.shVerify it works by checking your crontab:
crontab -l💡 Tips & Best Practices
- Test each step separately before combining them into a full script.
- Use
chmod +x your_script.shto make your script executable. - Ensure the script logs errors or outputs to help with debugging (e.g., redirect output:
>> /path/to/logfile.log 2>&1). - Test cron by temporarily setting the schedule to run in a few minutes.
- Make sure your script handles missing or unexpected data gracefully.
📁 Example Directory Structure
/weather_project/
│
├── weather_etl.sh         # Your shell script
├── weather_report.tsv     # Output log file
└── log.txt                # Optional log file for debugging
🚀 Final Notes
By completing this project, you’ll have built a real-world automation pipeline using:
- Shell scripting
- Text parsing tools (
grep,awk,sed) - Scheduling with
cron
This foundational knowledge can be extended to handle more complex workflows involving multiple locations, additional metrics, and various data sources.
📚 Helpful Commands
| Command | Purpose |
|---|---|
curl wttr.in/kathmandu | Fetch weather data |
date +"%Y %m %d" | Get current year/month/day |
crontab -e | Edit scheduled jobs |
crontab -l | List current cron jobs |
grep, awk, sed | Parse and extract data from text |
Practice Project: Historical Weather Forecast Comparison to Actuals
Learning objectives
In this practice project, you will:
- Initialize your log file
- Write a Bash script to download, extract, and load raw data into a report
- Add some basic analytics to your report
- Schedule your report to update daily
- Measure and report on historical forecasting accuracy
We’ve broken this project down into manageable steps. Feel free to try any or all of these on your own; however, we recommend checking your work with the details provided.
Exercise 1: Initialize Your Weather Report Log File
🎯 Objective
In this exercise, you will:
- Create a log file to store your weather data.
- Add a properly formatted header row that defines each column in the report.
This sets the foundation for collecting and organizing weather data in a structured way.
✅ Step-by-Step Instructions
1.1 Create the Log File
You’ll create a file named rx_poc.log which will store your daily weather observations and forecasts.
🔧 Task:
Create an empty file called rx_poc.log.
💻 Command:
touch rx_poc.logThis creates a new, empty file named
rx_poc.login your current directory.
1.2 Add a Header Row
To make your log file readable and usable for analysis, you need to add a header row with meaningful column names.
📝 Columns:
| Column | Description |
|---|---|
year | Year of observation |
month | Month of observation |
day | Day of observation |
obs_temp | Observed (actual) temperature |
fc_temp | Forecasted temperature |
🔧 Task:
Write the header to rx_poc.log, using tab-separated values.
💻 Command:
echo -e "year\tmonth\tday\tobs_temp\tfc_temp" > rx_poc.log
echo -eenables interpretation of backslash escapes like\t(tab).>overwrites the file — perfect for writing the first line (header).
💡 Why Use Variables?
As mentioned in the hint, using variables can make your code cleaner and more maintainable.
Example with variable:
header=$(echo -e "year\tmonth\tday\tobs_temp\tfc_temp")
echo "$header" > rx_poc.log
This is especially useful when you want to reuse or modify the header later.
✅ Final Output
After completing this exercise, your rx_poc.log file should contain only one line:
year month day obs_temp fc_temp(Columns separated by tabs)
🧪 Verify Your Work
To check the contents of the file:
cat rx_poc.logYou should see the header printed clearly.
✅ Summary
| Task | Command |
|---|---|
| Create empty log file | touch rx_poc.log |
| Add tab-separated header | echo -e "year\tmonth\t..." > rx_poc.log |
Exercise 2: Download the Raw Weather Data
🎯 Objective
In this exercise, you will:
- Create a Bash script to automate weather data retrieval.
- Assign the city name (
kathmandu) to a variable for flexibility. - Use
curlto download raw weather data and save it to a file namedweather_report.
This sets up the “Extract” phase of your ETL (Extract, Transform, Load) process.
✅ Step-by-Step Instructions
2.1 Create an Executable Bash Script
You’ll create a new shell script called rx_poc.sh that can be run directly from the terminal.
🔧 Task:
Create the script and make it executable.
💻 Commands:
Create the file:
touch rx_poc.shAdd the shebang line (first line in the file):
echo '#!/bin/bash' > rx_poc.shThe shebang (
#! /bin/bash) tells the system that this is a Bash script.
Make the script executable:
chmod u+x rx_poc.shThis gives user +x execute permissions on the script.
Verify:
ls -l rx_poc.shYou should see something like:
-rwxr--r-- 1 user group ... rx_poc.sh2.2 Assign the City Name to a Variable
To make your script flexible and easier to modify, store the city name in a variable.
🔧 Task:
Set a variable city to kathmandu.
💻 Command:
Add this line inside your script:
city=kathmanduUsing variables like
citymakes it easy to change locations later without hardcoding values.
2.3 Download Weather Data Using curl
Use the curl command to fetch weather data for kathmandu from wttr.in, a text-based weather service.
🔧 Task:
Download the weather report and save it to a file named weather_report.
💻 Command:
Add this to your script:
curl -s wttr.in/$city?T --output weather_report
-s: Silent mode — suppresses progress output.$city: Uses the variable you defined earlier.?T: Disables color codes for cleaner text output.--output weather_report: Saves the result into a file calledweather_report.
📝 Final Script (rx_poc.sh)
Your script should now look like this:
#!/bin/bash

city=kathmandu
curl -s wttr.in/$city?T --output weather_report
🧪 Test Your Script
Run your script to verify it downloads the weather data:
./rx_poc.shCheck the contents of the downloaded file:
cat weather_reportYou should see a human-readable weather report for kathmandu.
✅ Summary
| Task | Command / Line |
|---|---|
| Create script file | touch rx_poc.sh |
| Add shebang | echo '#!/bin/bash' > rx_poc.sh |
| Make executable | chmod u+x rx_poc.sh |
| Assign city variable | city=kathmandu |
| Download weather data | curl -s wttr.in/$city?T --output weather_report |
Great job! You’ve successfully created a Bash script that downloads weather data for kathmandu and saves it to a file. In the next exercise, you’ll extract the actual and forecasted temperatures from this raw data.
Exercise 3: Extract and Load the Required Data
🎯 Objective
In this exercise, you will:
- Extract the current observed temperature and tomorrow’s noon forecasted temperature from raw weather data.
- Store them in shell variables:
obs_tempandfc_temp. - Get the current local date (year, month, day) for kathmandu using the correct time zone.
- Format and append the extracted data as a new row to your log file
rx_poc.log.
This completes the “Transform” and “Load” phases of your ETL process.
✅ Step-by-Step Instructions
3.1 Extract Temperature Data
You’ll extract two key values:
obs_temp: The current observed temperaturefc_temp: The forecasted temperature for tomorrow at noon
🔧 Task:
Update your script to extract these values using text processing tools like grep, cut, and head/tail.
💻 Code to Add in rx_poc.sh:
# --- EXTRACT TEMPERATURE DATA ---

# Observed temperature
obs_temp=$(curl -s wttr.in/$city?T | grep -m 1 '°.' | grep -Eo -e '-?[[:digit:]].*')
echo "The current Temperature of $city: $obs_temp"

# Forecast temperature for noon tomorrow
fc_temp=$(curl -s wttr.in/$city?T | head -23 | tail -1 | grep '°.' | cut -d 'C' -f2 | grep -Eo -e '-?[[:digit:]].*')
echo "The forecasted temperature for noon tomorrow for $city: $fc_temp"
grep -m 1: gets only the first match (current temp)grep -Eo: extracts only the numeric part of the temperaturehead/tail: helps isolate the specific line with tomorrow’s noon forecast
3.2 Get Current Local Date for kathmandu
Since the analytics team wants data in local time, you must set the correct time zone.
🔧 Task:
Use the date command with the TZ environment variable to get local date components.
💻 Code to Add:
# Set time zone for kathmandu
TZ='Asia/kathmandu'

# Get year, month, day in local time
day=$(date +%d)
month=$(date +%m)
year=$(date +%Y)
This ensures accurate date values based on kathmandu’s local time (UTC+5:45).
3.3 Format and Append Data to Log File
Now combine all five fields into one tab-separated record and append it to your log file.
🔧 Task:
Construct a record string and add it to rx_poc.log.
💻 Code to Add:
# Format record with tabs
record=$(echo -e "$year\t$month\t$day\t$obs_temp\t$fc_temp")

# Append to log file
echo -e "$record" >> rx_poc.log
>>appends without overwriting existing content-eenables interpretation of\tas tab characters
📝 Final Script (rx_poc.sh) Example
#!/bin/bash

# --- CONFIG ---
city=kathmandu

# --- DOWNLOAD RAW DATA ---
curl -s wttr.in/$city?T --output weather_report

# --- EXTRACT TEMPERATURES ---
obs_temp=$(curl -s wttr.in/$city?T | grep -m 1 '°.' | grep -Eo -e '-?[[:digit:]].*')
fc_temp=$(curl -s wttr.in/$city?T | head -23 | tail -1 | grep '°.' | cut -d 'C' -f2 | grep -Eo -e '-?[[:digit:]].*')

# --- GET LOCAL DATE ---
TZ='Asia/kathmandu'
day=$(date +%d)
month=$(date +%m)
year=$(date +%Y)

# --- FORMAT AND APPEND TO LOG ---
record=$(echo -e "$year\t$month\t$day\t$obs_temp\t$fc_temp")
echo -e "$record" >> rx_poc.log
🧪 Test Your Script
Run the script manually:
./rx_poc.shCheck the log file:
cat rx_poc.logYou should see the header followed by a new row like:
year	month	day	obs_temp	fc_temp
2025	4	5	22	24
✅ Summary
| Task | Key Tools Used |
|---|---|
| Download weather data | curl |
| Extract observed temperature | grep, grep -Eo |
| Extract forecasted temperature | head, tail, grep, cut, grep |
| Get local date | date, TZ='Asia/kathmandu' |
| Format and append record | echo -e, >> |
Great job! You’ve successfully built a full ETL pipeline that:
- Downloads weather data
- Parses and cleans relevant values
- Logs structured data daily
Exercise 4: Schedule Your Bash Script to Run Daily at Noon (kathmandu Time)
🎯 Objective
In this exercise, you will:
- Determine the correct system time equivalent for 12:00 PM kathmandu time.
- Use
crontabto schedule your script (rx_poc.sh) to run automatically every day at that time.
This completes the automation of your ETL pipeline.
✅ Step-by-Step Instructions
4.1 Determine Correct Cron Time
Since cron uses your system’s local time, you need to convert noon in kathmandu (UTC+5:45) to your system’s local time.
🔧 Task:
Check your system time and UTC time:
date
date -u
Example Output:
Mon Feb 13 11:28:12 EST 2023   # System time (EST = UTC-5)
Mon Feb 13 16:28:16 UTC 2023   # UTC time
Now calculate:
- kathmandu is UTC+5:45
- Your system is UTC-5
- So, difference between your system and kathmandu = 6 hours
👉 Therefore, 12:00 PM in kathmandu = 6:00 AM on your system
4.2 Edit Crontab to Add Your Job
You’ll now edit your crontab file to add a job that runs daily at the calculated time.
💻 Command:
crontab -eThis opens the default text editor.
🔧 Task:
Add the following line to schedule the script daily at 8:00 AM system time (replace with your actual converted time):
0 8 * * * /absolute/path/to/rx_poc.shExample:
0 8 * * * /home/user/weather_project/rx_poc.sh
0 8: Means “at 8:00 AM”* * *: Every day of the week, every month, every weekday
Save and exit the editor.
🧪 Verify Your Cron Job
To confirm it was added correctly:
crontab -lYou should see your new cron entry listed.
📝 Final Notes
- Ensure your script path is absolute, not relative.
- Make sure your script is executable (
chmod u+x rx_poc.sh) - You can test your cron setup by temporarily scheduling the job to run in a few minutes:
(Runs every 2 minutes — useful for testing)*/2 * * * * /path/to/rx_poc.sh
✅ Summary
| Task | Command / Action |
|---|---|
| Check system time | date |
| Check UTC time | date -u |
| Convert noon kathmandu → system time | Manual calculation (UTC+5:45 vs system) |
| Edit crontab | crontab -e |
| Add daily cron job | 0 8 * * * /path/to/rx_poc.sh |
| List current cron jobs | crontab -l |
🎉 Congratulations!
You’ve successfully automated your weather data collection process. Every day at noon (local time in kathmandu), your script will:
- Download weather data
- Extract observed and forecasted temperatures
- Log them in a structured format
- All without manual intervention!
Exercise 5: Create a Script to Report Historical Forecast Accuracy
🎯 Objective
In this exercise, you will:
- Create a new script
fc_accuracy.shthat:- Calculates how accurate past temperature forecasts were compared to actual observed temperatures.
- Labels the accuracy based on defined ranges (e.g., excellent, good, fair, poor).
- Appends the result to a historical accuracy report file.
This gives you the ability to analyze and evaluate forecasting performance over time.
✅ Step-by-Step Instructions
5.0 Initialize the Historical Accuracy File
Before calculating accuracy, create a new tab-separated file with headers:
echo -e "year\tmonth\tday\tobs_temp\tfc_temp\taccuracy\taccuracy_range" > historical_fc_accuracy.tsvThis file will store each day’s forecast vs. actual comparison.
🧩 Section 5.1: Calculate Forecast Accuracy for One Day
We’ll start by analyzing just one day — today’s observed temp vs yesterday’s forecast.
5.1.1 Extract Yesterday’s Forecasted Temperature
Assume the second-to-last line in rx_poc.log contains yesterday’s forecast.
yesterday_fc=$(tail -2 rx_poc.log | head -1 | cut -d $'\t' -f5)This extracts the forecasted temperature from yesterday’s log entry.
5.1.2 Extract Today’s Observed Temperature
The last line of the log is today’s data:
today_temp=$(tail -1 rx_poc.log | cut -d $'\t' -f4)This gets today’s observed temperature.
5.1.3 Calculate Forecast Accuracy
Compute the difference between forecast and observation:
accuracy=$((yesterday_fc - today_temp))Positive values = forecast was too high
Negative values = forecast was too low
🧩 Section 5.2: Assign an Accuracy Label
Use conditional logic to label the forecast accuracy:
if [ -1 -le $accuracy ] && [ $accuracy -le 1 ]; then
    accuracy_range="excellent"
elif [ -2 -le $accuracy ] && [ $accuracy -le 2 ]; then
    accuracy_range="good"
elif [ -3 -le $accuracy ] && [ $accuracy -le 3 ]; then
    accuracy_range="fair"
else
    accuracy_range="poor"
fi
This categorizes forecast accuracy into four levels.
🧩 Section 5.3: Append Record to Accuracy Log
Now extract the date and build a full record:
row=$(tail -1 rx_poc.log)
year=$(echo "$row" | cut -d $'\t' -f1)
month=$(echo "$row" | cut -d $'\t' -f2)
day=$(echo "$row" | cut -d $'\t' -f3)
Then append all fields to your accuracy file:
echo -e "$year\t$month\t$day\t$today_temp\t$yesterday_fc\t$accuracy\t$accuracy_range" >> historical_fc_accuracy.tsv📄 Final Script (fc_accuracy.sh)
#!/bin/bash

# --- EXTRACT FORECAST & OBSERVED TEMP ---
yesterday_fc=$(tail -2 rx_poc.log | head -1 | cut -d $'\t' -f5)
today_temp=$(tail -1 rx_poc.log | cut -d $'\t' -f4)

# --- CALCULATE ACCURACY ---
accuracy=$((yesterday_fc - today_temp))

# --- ASSIGN ACCURACY LABEL ---
if [ -1 -le $accuracy ] && [ $accuracy -le 1 ]; then
    accuracy_range="excellent"
elif [ -2 -le $accuracy ] && [ $accuracy -le 2 ]; then
    accuracy_range="good"
elif [ -3 -le $accuracy ] && [ $accuracy -le 3 ]; then
    accuracy_range="fair"
else
    accuracy_range="poor"
fi

# --- APPEND TO HISTORICAL REPORT ---
row=$(tail -1 rx_poc.log)
year=$(echo "$row" | cut -d $'\t' -f1)
month=$(echo "$row" | cut -d $'\t' -f2)
day=$(echo "$row" | cut -d $'\t' -f3)

echo -e "$year\t$month\t$day\t$today_temp\t$yesterday_fc\t$accuracy\t$accuracy_range" >> historical_fc_accuracy.tsv
🧪 Test Your Script
Make it executable:
chmod +x fc_accuracy.shRun it manually:
./fc_accuracy.shCheck the output:
cat historical_fc_accuracy.tsvYou should see something like:
year	month	day	obs_temp	fc_temp	accuracy	accuracy_range
2025	4	5	22	24	-2	good
🔄 Optional: Generalize for All Days
To process the entire log at once, loop through pairs of lines:
tail -n +2 rx_poc.log | while read line; do
    # Save previous line as forecast
    if [ -n "$prev_line" ]; then
        yesterday_fc=$(echo "$prev_line" | cut -d $'\t' -f5)
        today_temp=$(echo "$line" | cut -d $'\t' -f4)
        accuracy=$((yesterday_fc - today_temp))

        # ... rest of processing ...
    fi
    prev_line="$line"
done
This allows you to build a full history of forecast accuracy across multiple days.
✅ Summary
| Task | Key Tools Used |
|---|---|
| Extract forecast & observed temp | tail, head, cut |
| Calculate accuracy | Arithmetic expansion $(( )) |
| Assign accuracy range | if-elif-else conditions |
| Append to log | echo -e with >> |
| Make script reusable | Store in fc_accuracy.sh and make executable |
🎉 Well done!
You’ve now built a complete system that:
- Automatically logs weather data daily
- Analyzes how accurate forecasts were
- Stores and labels historical forecast accuracy
Exercise 6: Create a Script to Report Weekly Statistics of Historical Forecasting Accuracy
🎯 Objective
In this exercise, you will:
- Download a synthetic historical forecasting accuracy dataset.
- Write a Bash script called
weekly_stats.shthat:- Extracts the last 7 days of forecast errors.
- Calculates and displays the minimum and maximum absolute errors for the week.
This helps you understand how to analyze performance trends over time using shell scripting.
✅ Step-by-Step Instructions
6.1 Download the Synthetic Dataset
You’ll begin by downloading a synthetic TSV file containing historical forecast accuracy data.
💻 Command:
wget https://cf-courses-data.s3.us.cloud-object-storage.appdomain.cloud/IBMSkillsNetwork-LX0117EN-Coursera/labs/synthetic_historical_fc_accuracy.tsvThis creates a file named
synthetic_historical_fc_accuracy.tsvin your current directory.
6.2 Create the Script weekly_stats.sh
Now create a new executable Bash script to process the weekly forecast errors.
💻 Commands:
touch weekly_stats.sh
chmod +x weekly_stats.sh
Then open it with your favorite editor (like nano, vim, or gedit) and start editing.
6.3 Extract Last Week’s Forecast Errors
We extract the last 7 lines from the dataset and keep only the “accuracy” column (column 6).
echo $(tail -7 synthetic_historical_fc_accuracy.tsv | cut -f6) > scratch.txt
week_fc=($(cat scratch.txt))
This stores the last 7 forecast errors into a Bash array called
week_fc.
6.4 Validate the Array Contents (Optional)
Print each value to verify the contents:
for i in {0..6}; do
    echo ${week_fc[$i]}
done
6.5 Convert to Absolute Values
Loop through the array and convert negative values to positive:
for i in {0..6}; do
  if [[ ${week_fc[$i]} < 0 ]]; then
    week_fc[$i]=$(( -1 * ${week_fc[$i]} ))
  fi
done
This ensures all values represent absolute error.
6.6 Calculate Minimum and Maximum Error
Initialize min/max variables and loop through the array:
minimum=${week_fc[0]}
maximum=${week_fc[0]}

for item in "${week_fc[@]}"; do
  if (( $item < $minimum )); then
    minimum=$item
  fi
  if (( $item > $maximum )); then
    maximum=$item
  fi
done
6.7 Display Results
Finally, print the results:
echo "Minimum absolute error = $minimum"
echo "Maximum absolute error = $maximum"
📄 Final Script (weekly_stats.sh)
#!/bin/bash

# Extract the last 7 accuracy values
tail -7 synthetic_historical_fc_accuracy.tsv | cut -f6 > scratch.txt
week_fc=($(cat scratch.txt))

# Convert to absolute values
for i in {0..6}; do
  if [[ ${week_fc[$i]} -lt 0 ]]; then
    week_fc[$i]=$(( -1 * ${week_fc[$i]} ))
  fi
done

# Initialize min and max
minimum=${week_fc[0]}
maximum=${week_fc[0]}

# Find min and max
for item in "${week_fc[@]}"; do
  if (( item < minimum )); then
    minimum=$item
  fi
  if (( item > maximum )); then
    maximum=$item
  fi
done

# Output result
echo "Minimum absolute error = $minimum"
echo "Maximum absolute error = $maximum"
🧪 Test Your Script
Make sure the dataset is downloaded:
ls -l synthetic_historical_fc_accuracy.tsvRun your script:
./weekly_stats.shExpected output:
Minimum absolute error = 0
Maximum absolute error = 4
(Values may vary depending on dataset content.)
✅ Summary
| Task | Key Tools Used |
|---|---|
| Download dataset | wget |
| Read last 7 entries | tail, cut |
| Store in array | Bash arrays |
| Convert to absolute values | Arithmetic expansion $(( )) |
| Find min/max | Conditional loops |
| Print result | echo |
🎉 Great job! You’ve successfully built a script that processes a dataset and calculates key statistics — all using Bash.
This skill is essential for:
- Automating data analysis pipelines
- Monitoring model performance
- Creating daily reports in production environments
✅ Course Summary: Real-World Bash Scripting & Automation
🎉 Congratulations on Completing the Project!
You’ve successfully completed a hands-on, real-world project that integrates everything you’ve learned throughout this course. You now have the skills to:
🔧 Key Skills You’ve Mastered
| Skill | Description |
|---|---|
| File Management | Created and managed log files for structured data logging (rx_poc.log, historical_fc_accuracy.tsv) |
| Bash Scripting | Built full ETL scripts from scratch using shell commands and variables |
| Data Extraction | Used tools like curl, grep, cut, awk, and head/tail to parse raw weather data |
| Time Handling | Worked with time zones using TZ and scheduled tasks based on local time |
| Automation with Cron | Scheduled daily execution of your script using crontab |
| Historical Analysis | Compared forecasted vs actual temperatures and categorized accuracy |
| Statistical Reporting | Calculated minimum and maximum absolute errors from historical data |
📌 What You Built
🌤️ Daily Weather Logging System
- Scrapes weather data from
wttr.in - Logs observed and forecasted temperatures
- Runs automatically every day at noon (kathmandu time)
📊 Forecast Accuracy Analyzer
- Compares yesterday’s forecast to today’s observation
- Labels forecast accuracy as excellent/good/fair/poor
- Stores results in a historical report
📈 Weekly Forecast Statistics Reporter
- Downloads synthetic historical data
- Calculates weekly min/max absolute errors
- Demonstrates how to process datasets in Bash
💡 Real-World Applications
The techniques you practiced are used daily in:
- DevOps pipelines: Automating system monitoring and reporting
- Data Engineering: Building ingestion pipelines and batch processing jobs
- Machine Learning Operations (MLOps): Tracking model performance over time
- System Administration: Scheduling backups, updates, and audits
🙌 Final Words
By completing this course and project, you’ve demonstrated a strong grasp of shell scripting, automation, and data analysis using only the command line — a powerful foundation for any tech career.
Keep practicing, keep automating, and most importantly — keep building!
🎓 Scheduled Backup Script
🎯 Overview
In this final hands-on lab, you will demonstrate your Linux scripting and automation skills by creating a secure, automated backup system for encrypted password files.
You are acting as the Lead Linux Developer at ABC International Inc., a company currently suffering from inefficient manual backups of sensitive data.
Your task is to write a Bash script named backup.sh that:
- Automatically finds and backs up any encrypted password files modified in the last 24 hours.
- Archives them securely with a timestamped filename.
- Logs each operation.
- Schedules itself to run daily using
cron.
🛠️ Getting Started with Your Final Project Script: backup.sh
📌 Task 0: Download and Open the Template Script
Let’s start by downloading and opening the provided template file: backup.sh.
🔧 Steps to Get Started
✅ Step 1: Open a New Terminal
- In the menu bar, click:
Terminal → New Terminal
✅ Step 2: Download the Template Script
Run this command in the terminal:
wget https://cf-courses-data.s3.us.cloud-object-storage.appdomain.cloud/pWN3kO2yWEuKMvYJdcLPQg/backup.shThis downloads the starter script named backup.sh into your current working directory.
✅ Step 3: Open the File in the IDE
-
Click on:
File → Open -
Then select the file
backup.shfrom your project directory.
You should now see the contents of the script inside the editor window.
📄 About the Template Script
The backup.sh file contains helpful comments that guide you through each required task. These are labeled like:
# [TASK 1]
# [TASK 2]
# ...
⚠️ Important:
- Do not delete or modify any lines above
# [TASK 1]- Do not remove or change any comment markers like
# [TASK X]
💾 Saving Your Progress
✅ Save the File Locally
-
Press:
- Windows/Linux:
CTRL + S - Mac:
CMD + S
- Windows/Linux:
-
Or go to:
File → Save
✅ Download the File to Your Computer
To keep a local copy:
- Go to:
File → Download
This will download your current backup.sh file so you can continue working offline or re-upload it later.
📤 Re-Uploading Your Work (If Needed)
If you need to continue working after restarting your session, follow these steps:
✅ Step 1: Create a New backup.sh File
In the terminal, run:
touch backup.sh✅ Step 2: Open the File in the Editor
-
Go to:
File → Open -
Select the newly created (empty)
backup.shfile.
✅ Step 3: Copy & Paste Your Local Content
- Open your locally saved
backup.shfile. - Select all content (
CTRL+AorCMD+A) - Copy it (
CTRL+CorCMD+C) - Paste it into the online editor window (
CTRL+VorCMD+V)
🔧 Final Project Tasks : Script Development Guide
In this guide, we’ll walk through each of the first six tasks in your backup.sh script.
You’ll be writing Bash code to:
- Accept command-line arguments
- Set variables for readability and use
- Capture timestamps
- Define file names and paths
✅ Task 1: Set Variables from Command-Line Arguments
🎯 Objective:
Capture two directories using command line arguments:
- The directory to back up (
targetDirectory) - The destination directory for the backup (
destinationDirectory)
📄 Code:
# [TASK 1]
targetDirectory=$1
destinationDirectory=$2
$1is the first argument,$2is the second one provided when running the script.
📁 Example usage:
./backup.sh /etc/secrets /backup✅ Task 2: Display the Values of the Arguments
🎯 Objective:
Print both directory paths to the terminal so users can confirm what was passed.
📄 Code:
# [TASK 2]
echo "Target Directory: $targetDirectory"
echo "Destination Directory: $destinationDirectory"
✅ Task 3: Define a Timestamp Variable
🎯 Objective:
Create a variable called currentTS that holds the current timestamp in seconds since epoch.
This will help create unique filenames for backups.
📄 Code:
# [TASK 3]
currentTS=$(date +%s)
$(date +%s)runs thedatecommand and captures its output (seconds since Jan 1, 1970).
✅ Task 4: Set Backup File Name Using Timestamp
🎯 Objective:
Build a filename like backup-1634571345.tar.gz using the timestamp.
📄 Code:
# [TASK 4]
backupFileName="backup-$currentTS.tar.gz"
This creates a unique archive name for each run.
✅ Task 5: Get Absolute Path of Current Directory
🎯 Objective:
Store the absolute path of the current working directory in a variable called origAbsPath.
📄 Code:
# [TASK 5]
origAbsPath=$(pwd)
$(pwd)returns the full path of the current directory.
✅ Task 6: Get Absolute Path of Destination Directory
🎯 Objective:
Change to the destination directory and capture its absolute path in destAbsPath.
Also include error handling if the directory doesn’t exist or is inaccessible.
📄 Code:
# [TASK 6]
cd "$destinationDirectory" || exit
destAbsPath=$(pwd)
cd "$destinationDirectory"attempts to move to the target dir.|| exitensures the script exits cleanly if thecdfails.$(pwd)gets the full path after changing directories.
📌 Summary Table
| Task | Objective | Code |
| ---- | --------------------------- | ----------------------------------------------- | --- | ------------------------- |
| 1 | Set variables from args | targetDirectory=$1, destinationDirectory=$2 |
| 2 | Echo values to screen | echo "$targetDirectory", etc. |
| 3 | Store current timestamp | currentTS=$(date +%s) |
| 4 | Build backup filename | backupFileName="backup-$currentTS.tar.gz" |
| 5 | Save current directory path | origAbsPath=$(pwd) |
| 6 | Save destination dir path | cd "$destinationDirectory" | | exit; destAbsPath=$(pwd) |
✅ Task 7: Change to Target Directory
🎯 Objective:
Navigate from the current working directory to the targetDirectory.
We’ll first return to the original absolute path (origAbsPath) and then move into the target directory.
This ensures we’re in the correct location when searching for files.
📄 Code:
# [TASK 7]
cd "$origAbsPath" || exit
cd "$targetDirectory" || exit
cd "$origAbsPath"returns to the starting directorycd "$targetDirectory"moves into the folder containing encrypted files|| exitensures the script stops if it can’t access a directory
✅ Task 8: Define Timestamp for 24 Hours Ago
🎯 Objective:
Calculate a variable called yesterdayTS that holds the timestamp (in seconds) of 24 hours before currentTS.
This value will be used later to find files modified in the last 24 hours.
📄 Code:
# [TASK 8]
yesterdayTS=$(($currentTS - 24 * 60 * 60))
$(($currentTS - 24*60*60))subtracts 24 hours (in seconds) from the current timestamp- This gives us a Unix timestamp representing 24 hours ago
🧠 Understanding Arrays in Bash – A Practical Guide
In your final project script, you’ll encounter this line:
declare -a toBackupThis line declares a variable called toBackup as an array — a special type of variable that can hold multiple values, which is extremely useful when dealing with lists of files or other data.
🔧 What is an Array?
An array is like a list: it allows you to store and manage multiple items under a single variable name.
✅ Example:
declare -a myArray
myArray+=("Linux")
myArray+=("is")
myArray+=("cool!")
Now, myArray contains:
"Linux"at index 0"is"at index 1"cool!"at index 2
You can print the entire array using:
echo ${myArray[@]}💻 Output:
Linux is cool!
${myArray[@]}expands to all elements in the array, separated by spaces.
➕ How to Add Items to an Array
Use the +=() syntax to append items:
myArray+=("new item")In your script, this line will be used to collect all files modified in the last 24 hours:
toBackup+=($file)This adds each matching file to the toBackup array.
📁 Using Arrays with tar for Backup
Once you’ve collected all the files you want to back up into the toBackup array, you can pass them all at once to the tar command:
tar -czvf "$backupFileName" "${toBackup[@]}"This creates a .tar.gz archive containing all the files listed in the toBackup array.
The quotes around
"${toBackup[@]}"are important — they preserve spaces in filenames.
🧪 Full Example in Context
Here’s how arrays are used in your backup script:
# Declare an empty array
declare -a toBackup

# Loop through all files in current directory
for file in *
do
    # Get last modified time of file (in seconds)
    fileTS=$(date -r "$file" +%s)

    # If file was modified within the last 24 hours
    if [[ $fileTS -gt $yesterdayTS ]]
    then
        # Add it to the backup list
        toBackup+=("$file")
    fi
done

# Archive all files in the array
tar -czvf "$backupFileName" "${toBackup[@]}"
✅ Task 9: Loop Through All Files and Directories
🎯 Objective:
Use a for loop with the wildcard * to iterate over all items in the current directory.
This is useful for checking each file or folder to determine whether it should be backed up.
📄 Code:
# [TASK 9]
for file in *
do
The
*wildcard matches every file and directory in the current working directory.
✅ Task 10: Check If File Was Modified Within Last 24 Hours
🎯 Objective:
Inside the loop, check if the file was modified within the last 24 hours by comparing its modification time (date -r $file +%s) to the yesterdayTS timestamp.
📄 Code:
# [TASK 10]
    if [[ `date -r "$file" +%s` -gt $yesterdayTS ]]
    then
date -r "$file" +%s: gets the last modified time of the file in seconds-gt: means “greater than”$yesterdayTS: is the timestamp from 24 hours ago
✅ Task 11: Add Matching Files to Backup Array
🎯 Objective:
If the file was modified in the last 24 hours, add it to the toBackup array.
This array will later be used to create the backup archive.
📄 Code:
# [TASK 11]
        toBackup+=("$file")
    fi
done
toBackup+=("$file")adds the file to the arrayficloses theifstatementdoneends theforloop
🧪 Full Code Block (Tasks 9–11)
Here’s how these sections fit together:
# [TASK 9]
for file in *
do
    # [TASK 10]
    if [[ `date -r "$file" +%s` -gt $yesterdayTS ]]
    then
        # [TASK 11]
        toBackup+=("$file")
    fi
done
This block:
- Loops through all files/dirs
- Checks their modification time
- Adds recent ones to the backup list
✅ Task 12: Compress Files into an Archive
🎯 Objective:
Use the tar command to compress all files collected in the toBackup array into a single .tar.gz file named using the timestamped filename stored in backupFileName.
📄 Code:
# [TASK 12]
tar -czvf "$backupFileName" "${toBackup[@]}"
c: create a new archivez: compress with gzipv: verbose output (show progress)f: specify filename"${toBackup[@]}": expands to all files added to the array
✅ Task 13: Move Backup File to Destination Directory
🎯 Objective:
Move the newly created backup archive from the current directory to the destination directory (destAbsPath), where backups are stored permanently.
📄 Code:
# [TASK 13]
mv "$backupFileName" "$destAbsPath/"
mv: moves the file"$destAbsPath/": ensures it goes to the correct destination directory
🧪 Full Code Block (Tasks 12–13)
Here’s how these two sections fit together:
# [TASK 12]
tar -czvf "$backupFileName" "${toBackup[@]}"

# [TASK 13]
mv "$backupFileName" "$destAbsPath/"
This block:
- Archives all recent files into one compressed
.tar.gzfile- Moves that file to the designated backup storage location
✅ Task 14: Save and Download backup.sh
🎯 Objective:
Save your completed backup.sh file locally for submission.
🔧 Steps:
-
Save the file:
- Press:
- Windows/Linux:
CTRL + S - Mac:
CMD + S
- Windows/Linux:
- Press:
-
Download the file:
- Go to:
File → Download
- Go to:
✅ You now have a local copy of your script ready to submit for peer grading.
✅ Task 15: Make Script Executable
🎯 Objective:
Ensure your script can be run directly from the terminal.
📄 Code:
chmod +x backup.sh
ls -l backup.sh
chmod +x: makes the file executablels -l: shows permissions — you should see-rwxr-xr-xor similar
✅ Task 16: Test Your Script Manually
🎯 Objective:
Test that your script correctly creates a backup archive.
📄 Commands:
wget https://cf-courses-data.s3.us.cloud-object-storage.appdomain.cloud/IBM-LX0117EN-SkillsNetwork/labs/Final%20Project/important-documents.zip
unzip -DDo important-documents.zip
touch important-documents/*
./backup.sh important-documents .
This:
- Downloads a sample folder (
important-documents)- Updates all files’ timestamps
- Runs your script to back up modified files
✅ Check Output:
ls -lYou should see a file like:
backup-1634571345.tar.gz✅ Task 17: Schedule Script with Cron
🎯 Objective:
Schedule your script to run daily using cron.
📄 Steps:
Step 1: Copy script to system-wide bin
sudo cp backup.sh /usr/local/bin/Step 2: Start cron service
sudo service cron startStep 3: Open crontab editor
crontab -eAdd this line to schedule the script to run every minute (for testing):
*/1 * * * * /usr/local/bin/backup.sh /home/project/important-documents /home/projectWait a minute and check if new .tar.gz files appear in /home/project.
Once verified, stop cron:
sudo service cron stopNow edit your crontab again and change the schedule to run once daily at midnight:
0 0 * * * /usr/local/bin/backup.sh /home/project/important-documents /home/projectSave and exit.
To verify your cron job:
crontab -l📌 Final Notes
- Always test scripts manually before scheduling them.
- Use
chmod +xso scripts can be executed directly. - Cron requires the full path to your script and directories.
- In virtual environments like Theia, you must explicitly start
cron.
📘 Congratulations!
You’ve successfully completed all tasks in your final project.
Your backup.sh script is now:
- Fully functional
- Tested
- Scheduled to run daily
🎓 You’re officially ready to automate real-world Linux tasks!