Master the Clone: Complete Guide to MySQL Replication on Ubuntu 24.04
Introduction
Setting up Master-Slave replication is the first step toward building a scalable and highly available database infrastructure. It allows you to offload read traffic (like analytics) to the Slave while ensuring all write operations go to the Master, significantly reducing load and providing a crucial backup/failover point.
This guide details a proven, step-by-step process for setting up MySQL replication between two Ubuntu 24.04 virtual machines in the same VPC, including the critical solution for the common caching_sha2_password authentication error encountered in modern MySQL versions.
Our Environment Setup
| Server Role | VM Name | Private IP | Configuration Key |
|---|---|---|---|
| Master | Janak-ec1 | 10.10.1.20 | server-id = 1 |
| Slave | Janak-ec2 | 10.10.1.125 | server-id = 2 |
Part 1: Prerequisites & Security (On Both Servers)
Before installation, ensure your network allows traffic between the two VMs.
Step 1: Network & Firewall Configuration
Ensure both the VPC Network ACL and the UFW firewall allow communication on the MySQL port.
On the Master (10.10.1.20):
The Master must allow port 3306 only from the Slave’s IP.
# Allow TCP port 3306 only from the Slave IP
sudo ufw allow from 10.10.1.125 to any port 3306
On the Slave (10.10.1.125):
The Slave needs outbound access, which is usually permitted, but you can explicitly allow the port for safety:
# Allow MySQL access generally
sudo ufw allow 3306/tcp
(Verify both with sudo ufw status verbose)
Step 2: Install MySQL (On Both Servers)
Run the installation on both the Master and the Slave.
sudo apt update
sudo apt install mysql-server -y
Part 2: Master Server Configuration (10.10.1.20)
The Master needs binary logging enabled and must be configured to listen on its private IP.
Step 3: Configure mysqld.cnf
Edit the main MySQL configuration file:
sudo nano /etc/mysql/mysql.conf.d/mysqld.cnfApply the following mandatory and critical settings within the [mysqld] section:
[mysqld]
# ... other default settings ...

# Listen on the Master's private IP
bind-address = 10.10.1.20

# Unique ID for the Master
server-id = 1

# *** CRITICAL FIX: Authentication Compatibility ***
# This solves the "Authentication requires secure connection" error
default_authentication_plugin = mysql_native_password

# Enable binary logging for replication
log_bin = /var/log/mysql/mysql-bin.log

# ... other default settings ...
Save and close the file.
Step 4: Restart and Get Master Status
- Restart MySQL to apply the configuration:
sudo systemctl restart mysql - Connect and retrieve the Master’s starting position:
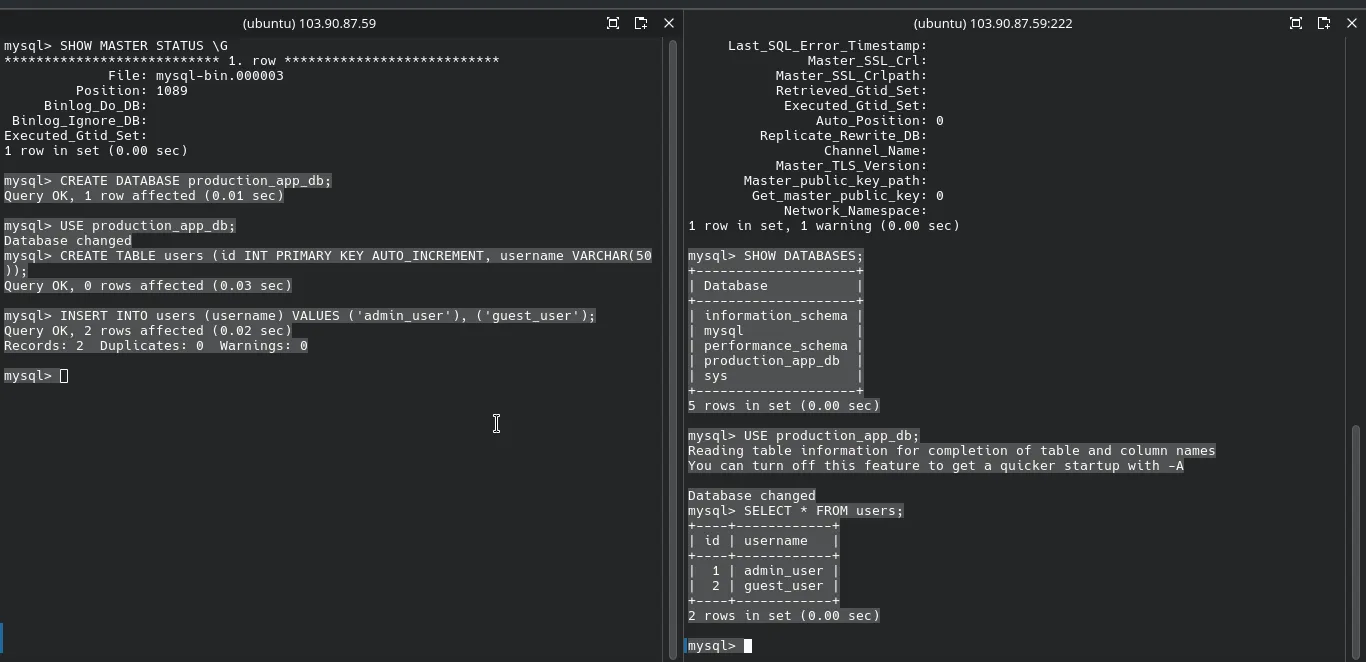
Record these two values:sudo mysql -u root -p mysql> SHOW MASTER STATUS \G- File:
mysql-bin.00000X(e.g.,mysql-bin.000003) - Position:
XXX(e.g.,157)
- File:
output
mysql> SHOW MASTER STATUS \G
*************************** 1. row ***************************
             File: mysql-bin.000003
         Position: 1089
     Binlog_Do_DB:
 Binlog_Ignore_DB:
Executed_Gtid_Set:
1 row in set (0.00 sec)

mysql>
Step 5: Create Replication User
We create the user using the mysql_native_password plugin and grant the necessary privilege.
- Create and Grant Privileges:
-- Use the strong password 'Linux@123456'
CREATE USER 'repl_user'@'10.10.1.125' IDENTIFIED WITH mysql_native_password BY 'Linux@123456';
GRANT REPLICATION SLAVE ON *.* TO 'repl_user'@'10.10.1.125';
FLUSH PRIVILEGES;

mysql> EXIT;
Part 3: Slave Server Configuration (10.10.1.125)
The Slave needs a unique ID and must be pointed to the Master.
Step 6: Configure mysqld.cnf
Edit the configuration file on the Slave:
sudo nano /etc/mysql/mysql.conf.d/mysqld.cnfApply the following settings within the [mysqld] section:
[mysqld]
# ... other default settings ...

# Listen on the Slave's private IP (recommended)
bind-address = 10.10.1.125

# Unique ID for the Slave (MUST be different from the Master's 1)
server-id = 2

# Enable relay logging
relay_log = /var/log/mysql/mysql-relay-bin
relay_log_index = /var/log/mysql/mysql-relay-bin.index

# ... other default settings ...
Save and close the file.
Step 7: Restart and Connect the Slave
- Restart MySQL on the Slave:
sudo systemctl restart mysql - Connect to MySQL and run the
CHANGE MASTER TOcommand using the values recorded in Step 4 and the password from Step 5:sudo mysql -u root -p mysql> SHOW MASTER STAT mysql> STOP SLAVE; mysql> RESET SLAVE ALL; -- Clears any previous attempts mysql> CHANGE MASTER TO MASTER_HOST ='10.10.1.20', MASTER_USER ='repl_user', MASTER_PASSWORD ='Linux@123456', MASTER_LOG_FILE = 'mysql-bin.000003', -- Use your recorded FILE MASTER_LOG_POS = 1089; -- Use your recorded POSITION mysql> START SLAVE;
Part 4: Final Verification
Step 8: Check Replication Status
On the Slave (10.10.1.125), check the status:
mysql> SHOW SLAVE STATUS \GSUCCESS VERIFICATION: The replication is working if you see:
Slave_IO_Running: YesSlave_SQL_Running: Yes
output
mysql>  SHOW SLAVE STATUS \G
*************************** 1. row ***************************
               Slave_IO_State: Waiting for source to send event
                  Master_Host: 10.10.1.20
                  Master_User: repl_user
                  Master_Port: 3306
                Connect_Retry: 60
              Master_Log_File: mysql-bin.000003
          Read_Master_Log_Pos: 1089
               Relay_Log_File: mysql-relay-bin.000002
                Relay_Log_Pos: 326
        Relay_Master_Log_File: mysql-bin.000003
             Slave_IO_Running: Yes
            Slave_SQL_Running: Yes
              Replicate_Do_DB:
          Replicate_Ignore_DB:
           Replicate_Do_Table:
       Replicate_Ignore_Table:
      Replicate_Wild_Do_Table:
  Replicate_Wild_Ignore_Table:
                   Last_Errno: 0
                   Last_Error:
                 Skip_Counter: 0
          Exec_Master_Log_Pos: 1089
              Relay_Log_Space: 536
              Until_Condition: None
               Until_Log_File:
                Until_Log_Pos: 0
           Master_SSL_Allowed: No
           Master_SSL_CA_File:
           Master_SSL_CA_Path:
              Master_SSL_Cert:
            Master_SSL_Cipher:
               Master_SSL_Key:
        Seconds_Behind_Master: 0
Master_SSL_Verify_Server_Cert: No
                Last_IO_Errno: 0
                Last_IO_Error:
               Last_SQL_Errno: 0
               Last_SQL_Error:
  Replicate_Ignore_Server_Ids:
             Master_Server_Id: 1
                  Master_UUID: 69425278-a8c6-11f0-aa89-020809d10005
             Master_Info_File: mysql.slave_master_info
                    SQL_Delay: 0
          SQL_Remaining_Delay: NULL
      Slave_SQL_Running_State: Replica has read all relay log; waiting for more updates
           Master_Retry_Count: 86400
                  Master_Bind:
      Last_IO_Error_Timestamp:
     Last_SQL_Error_Timestamp:
               Master_SSL_Crl:
           Master_SSL_Crlpath:
           Retrieved_Gtid_Set:
            Executed_Gtid_Set:
                Auto_Position: 0
         Replicate_Rewrite_DB:
                 Channel_Name:
           Master_TLS_Version:
       Master_public_key_path:
        Get_master_public_key: 0
            Network_Namespace:
1 row in set, 1 warning (0.00 sec)

mysql>
Step 9: Test Data Integrity
-
On the Master (
10.10.1.20): Create a production database and table.sudo mysql -u root -p mysql> SHOW MASTER STAT mysql> CREATE DATABASE production_app_db; mysql> USE production_app_db; mysql> CREATE TABLE users (id INT PRIMARY KEY AUTO_INCREMENT, username VARCHAR(50)); mysql> INSERT INTO users (username) VALUES ('admin_user'), ('guest_user'); mysql> EXIT;
output
mysql> CREATE DATABASE production_app_db;
Query OK, 1 row affected (0.01 sec)

mysql> USE production_app_db;
Database changed
mysql> CREATE TABLE users (id INT PRIMARY KEY AUTO_INCREMENT, username VARCHAR(50));
Query OK, 0 rows affected (0.03 sec)

mysql> INSERT INTO users (username) VALUES ('admin_user'), ('guest_user');
Query OK, 2 rows affected (0.02 sec)
Records: 2  Duplicates: 0  Warnings: 0

mysql> -
On the Slave (
10.10.1.125): Verify replication.sudo mysql -u root -p mysql> SHOW MASTER STAT mysql> SHOW DATABASES; -- Expected: 'production_app_db' listed. mysql> USE production_app_db; mysql> SELECT * FROM users; -- Expected: Both 'admin_user' and 'guest_user' listed.
Output
mysql> SHOW DATABASES;
+--------------------+
| Database           |
+--------------------+
| information_schema |
| mysql              |
| performance_schema |
| production_app_db  |
| sys                |
+--------------------+
5 rows in set (0.00 sec)

mysql> USE production_app_db;
Reading table information for completion of table and column names
You can turn off this feature to get a quicker startup with -A

Database changed
mysql> SELECT * FROM users;
+----+------------+
| id | username   |
+----+------------+
|  1 | admin_user |
|  2 | guest_user |
+----+------------+
2 rows in set (0.00 sec)

mysql>
This sequence guarantees a clean, stable, and verified replication setup ready for production use.
Conclusion
By implementing the default_authentication_plugin = mysql_native_password fix, you’ve bypassed a common hurdle in modern MySQL and successfully built a robust replication environment. This setup allows you to scale reads efficiently and provides crucial redundancy for your database.
References
MySQL Database Replication Master Replication: 6 Easy Steps for MySQL Master-Slave Setup How to setup MySQL Master-Slave Replication on Ubuntu 22.04