Galera Cluster is a robust, synchronous, multi-master cluster offering true active-active capabilities with no replication lag or lost transactions. In contrast, traditional MySQL active-active setups rely on asynchronous replication with potential lag and conflicts, making Galera Cluster a superior choice for applications needing strong consistency and high availability.
Ultimate Beginner’s Guide to Setting Up MariaDB Galera Cluster for High Availability
MariaDB Galera Cluster offers a powerful multi-primary database clustering solution that ensures high availability, fault tolerance, and real-time synchronous replication across multiple database nodes. It’s perfect for mission-critical applications that need zero lag and no data loss during replication.
This guide walks through the entire process of setting up a three-node MariaDB Galera Cluster from scratch, designed for beginners and Linux users who want a reliable, scalable database cluster.
What Is MariaDB Galera Cluster?
MariaDB Galera Cluster is a multi-master (active-active) database cluster allowing all nodes to handle reads and writes simultaneously. Every transaction is replicated synchronously to all nodes, ensuring all data stays perfectly in sync without delay or risk of lost transactions. It’s available exclusively on Linux and works best with at least three nodes for resilience.
Step 1: Prepare Your Environment
Before setting up the cluster, make sure you have:
- Three Linux nodes (bare-metal or VMs) with Debian, Ubuntu, CentOS, or Fedora OS.
- Synchronized system clocks using NTP for accurate timing.
- Root or sudo access on all nodes.
- Proper network connectivity with low latency between nodes.
- Installed rsync on each node (used for synchronizing database state):
sudo apt install rsync       # Debian/Ubuntu
sudo yum install rsync       # CentOS/RHEL
Step 2: Install MariaDB and Galera on All Nodes
Add MariaDB Official Repository (Debian/Ubuntu example):
sudo apt update
sudo apt install dirmngr software-properties-common apt-transport-https ca-certificates curl -y
curl -LsS https://r.mariadb.com/downloads/mariadb_repo_setup | sudo bash
sudo apt update
Install MariaDB Server, Client, and Galera Provider:
sudo apt install mariadb-server mariadb-client galera-4 -y(Note: Use galera-4 for MariaDB 10.4+ versions.)
Step 3: Secure MariaDB Installation
Run the security script on each node to set root passwords and harden security:
sudo mariadb-secure-installation- Set a strong root password.
- Remove anonymous users.
- Disallow remote root login.
- Remove the test database.
- Reload privilege tables.
Step 4: Configure Firewall Rules on Each Node
Enable ports essential for Galera Cluster communication:
sudo ufw allow 3306/tcp    # MariaDB client port
sudo ufw allow 4567/tcp    # Galera replication (reliable)
sudo ufw allow 4567/udp    # Galera replication (for multicast)
sudo ufw allow 4568/tcp    # Incremental State Transfer (IST)
sudo ufw allow 4444/tcp    # State Snapshot Transfer (SST)
sudo ufw reload
sudo ufw enable
Adapt commands if you use firewalld or another firewall system.
Step 5: Create Galera Configuration File on Each Node
Create /etc/mysql/conf.d/galera.cnf with this content, changing node names and IPs accordingly:
[mysqld]
binlog_format=ROW
default_storage_engine=InnoDB
innodb_autoinc_lock_mode=2
bind-address=0.0.0.0

wsrep_on=ON
wsrep_provider=/usr/lib/galera/libgalera_smm.so  # Adjust path if needed

wsrep_cluster_name="my_galera_cluster"
wsrep_cluster_address="gcomm://node1_ip,node2_ip,node3_ip"

wsrep_node_name="nodeX"           # Unique name, e.g., node1, node2, node3
wsrep_node_address="nodeX_ip" # Node’s exact IP address- Replace
node1_ip,node2_ip, andnode3_ipwith your actual node IPs. - Ensure each node’s name and IP address are unique.
Step 6: Start Your MariaDB Galera Cluster
Bootstrap the First Node (only once):
sudo systemctl stop mariadb
sudo galera_new_cluster
Or:
sudo systemctl start mariadb --wsrep-new-clusterStart Other Nodes Normally:
sudo systemctl start mariadbThese nodes will automatically join the cluster based on the configuration.
Step 7: Verify Cluster Status and Replication
Connect to MariaDB on any node:
sudo mariadb -u root -p
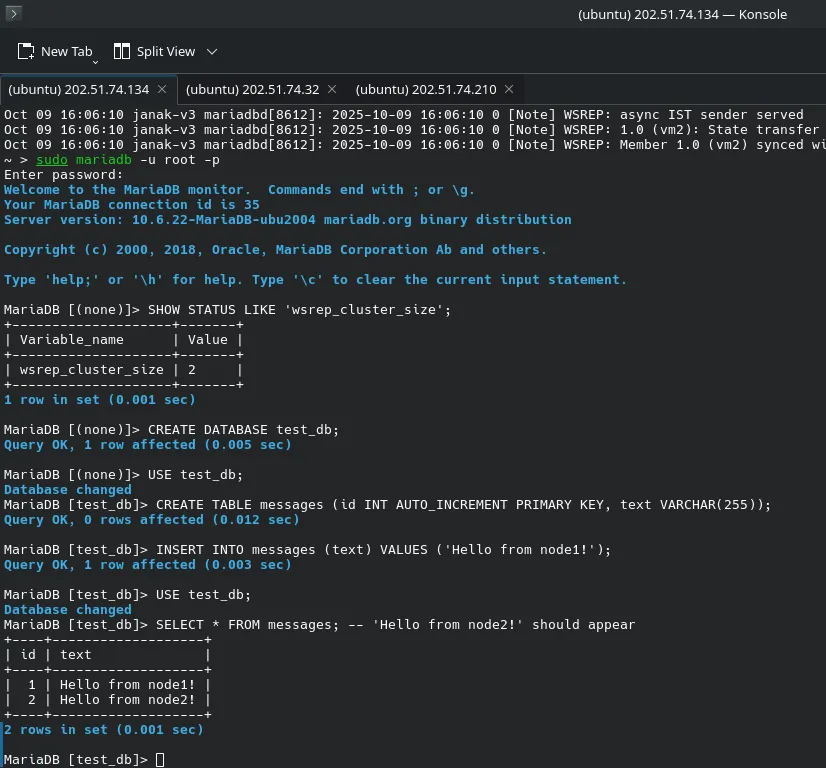
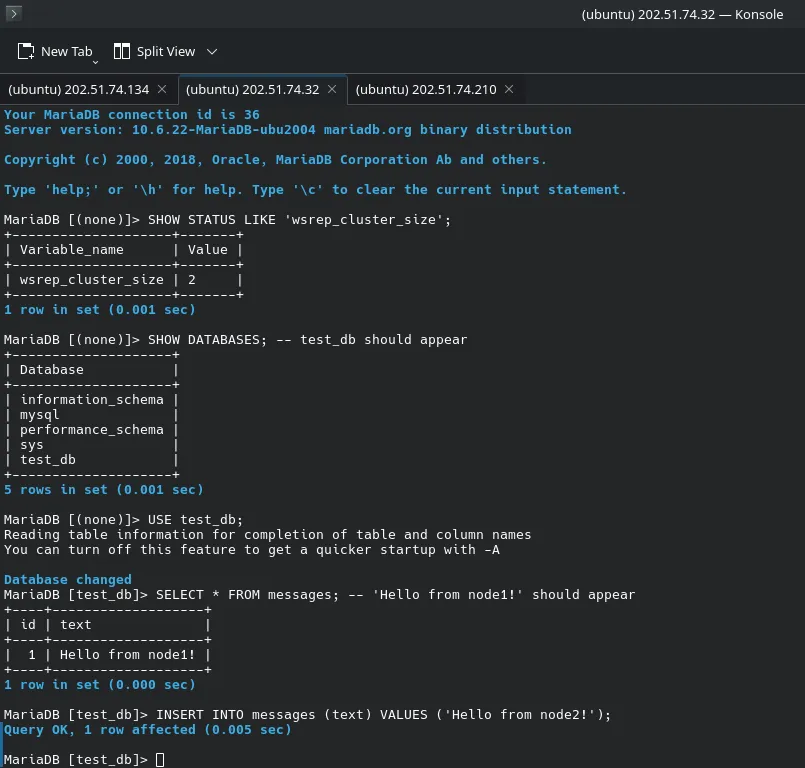
SHOW STATUS LIKE 'wsrep_cluster_size';- The number displayed should match your total nodes (e.g.,
3).
Test Replication Across Nodes
On node1:
CREATE DATABASE test_db;
USE test_db;
CREATE TABLE messages (
  id INT AUTO_INCREMENT PRIMARY KEY,
  text VARCHAR(255)
);
INSERT INTO messages (text) VALUES ('Hello from node1!');
On node2 or node3, check the data:
SHOW DATABASES;  -- test_db should appear
USE test_db;
SELECT * FROM messages;  -- 'Hello from node1!' should appear
Insert data on node2:
INSERT INTO messages (text) VALUES ('Hello from node2!');Verify on node1:
SELECT * FROM messages; -- 'Hello from node2!' should appearFinal Tips
- Use private IPs for cluster traffic to enhance security.
- Regularly monitor cluster status and logs to detect any network or state issues.
- Back up your database regularly even with high availability.
- For production, tweak advanced settings like SST method, authentication, and encryption as per your security needs.
With this guide, anyone can set up a robust MariaDB Galera Cluster ensuring continuous availability and strong data consistency across multiple nodes. Happy clustering!
Reference MariaDB Galera Cluster Guide - mariadb.com
https://medium.com/mr-dops/mariadb-with-galera-cluster-8ded2e83721b