Prerequisites
Before you start, make sure you have:
- A Cloudflare account and domain name added to your Cloudflare account and using Cloudflare’s nameservers.
- Running Node app locally on 3000 port. for testing
localnode.janakkumarshrestha0.com.np
I am gonna do ssh, access remote desktop (RDP) and access localhost:3000 app on my local pc form anywhere on internet (different network).
what is Cloudflare Tunnel?
Cloudflare Tunnel is a secure way to connect your local server or device to the internet through Cloudflare without exposing your IP address or opening ports. It creates an outbound-only encrypted connection from your server to Cloudflare, which then safely routes internet traffic to your server. This improves security by keeping your server hidden behind a firewall and simplifies remote access without complex network setups.
SERVER/HOST Setup (Debian Linux PC)
This is your local machine, made available remotely.
- Role: The host running the services and the tunnel daemon.
- Key Components:
- Services:
sshd(Port 22),xrdp(Port 3389, andlocalhost:3000(NodeJS app) configured for KDE Plasma). - Tunnel Daemon:
cloudflared-remote.service(Systemd service) running persistently to expose services via your configured domain names (ssh.*,desktop.*,localnode). - Security: Password login disabled; relies on SSH Keys and the Access policy.
- Services:
CLIENT Setup (Remote Linux/Windows PC)
This is the remote machine you use to access your host.
- Role: The machine initiating the secure connection.
- Key Components:
- Tunnel Client:
cloudflaredexecutable (used for authentication). - SSH Access: Uses the native SSH client (
ssh) combined with theProxyCommandto handle Cloudflare Access authentication. - RDP Access: Uses the
cloudflared access tcpcommand to create a local proxy listener (127.0.0.1:33389), which handles authentication and forwards the session to the RDP client (e.g., KRDC/Remmina).
- Tunnel Client:
SERVER/CLIENT Setup : Install Cloudflare Tunnel (cloudflared) on both local/host server and clients linux PCs
The cloudflared daemon is the service that creates the secure tunnel.
- Download and Install: Use the appropriate package manager for your Linux distribution (e.g., Debian/Ubuntu): On the Host Machine
wget https://github.com/cloudflare/cloudflared/releases/latest/download/cloudflared-linux-amd64.deb
sudo dpkg -i cloudflared-linux-amd64.deb
which cloudflared
- Confirm the cloudflared installation path -
/usr/local/bin/cloudflaredif different customize you path in config file.
Server Setup: Install and Verify Services (SSH & RDP) on you local/host server
We must ensure the services are installed and listening locally before the tunnel can expose them.
OpenSSH Server
sudo apt update
sudo apt install openssh-server -y
sudo systemctl enable --now ssh
sudo systemctl restart ssh
sudo systemctl status ssh
XRDP - for remote desktop access
sudo apt update
sudo apt install xrdp -y
sudo adduser xrdp ssl-cert
sudo systemctl enable --now xrdp
sudo systemctl status xrdp
This will set up SSH server for remote terminal access on port 22 and xrdp for remote desktop protocol (RDP) access on port 3389 on your linux machine. Both services will be enabled to start automatically on system boot.|
Run the following command to check the service on specifed port.
sudo ss -tuln | grep -E ':22 |:3389 |:3000 '
sudo ss -tuln | grep 22
Server Setup: Create the Named Tunnel and Configuration
- Authenticate Cloudflared:
This opens a browser. Log in to your Cloudflare account, authorize and save cert.pem.
cloudflared tunnel login - Create a new tunnel. You can name it whatever you like (
remote-acc):cloudflared tunnel create remote-acc
This generates your UUID (tunnel ID) (e.g., bbfb870f-c972-…) and JSON credentials inside /home/USERNAME/.cloudflared/.
-
Create/Edit
config.yml: Define the hostnames and the services they map to. Use your own domain namenano ~/.cloudflared/config.yml#tunnel: YOUR_TUNNEL_ID tunnel: bbfb870f-c972-4653-97af-41667bd5cb71 # Your Tunnel UUID #credentials-file: /home/YOUR_USERNAME/.cloudflared/YOUR_TUNNEL_ID.json credentials-file: /home/jack/.cloudflared/bbfb870f-c972-4653-97af-41667bd5cb71.json # Give path acccording to yours ingress: - hostname: ssh.janakkumarshrestha0.com.np # for ssh server service: ssh://localhost:22 - hostname: desktop.janakkumarshrestha0.com.np # For remote desktop service: tcp://localhost:3389 - hostname: localnode.janakkumarshrestha0.com.np # For node app service: http://localhost:3000 #If you have any other services on local host, go on like this... - service: http_status:404
Server Setup: DNS Configuration - Create DNS Records (Cloudflare)
You need to tell Cloudflare to route traffic from your chosen hostname to the tunnel. Use your own tunnel and domain name
cloudflared tunnel route dns remote-acc ssh.janakkumarshrestha0.com.np
cloudflared tunnel route dns remote-acc desktop.janakkumarshrestha0.com.np
cloudflared tunnel route dns remote-acc localnode.janakkumarshrestha0.com.np
This command automatically creates the correct CNAME record in your Cloudflare DNS, pointing your all hostname to the tunnel named remote-acc.
Server Setup: Run the Tunnel
Start the tunnel service so it can connect to the Cloudflare network and begin listening for traffic: Replace with your tunnel name
cloudflared tunnel run remote-acc- Keep this process running, as it maintains the connection between your local PC and the Cloudflare edge.
- We”ll discuss later to run tunnel on background, Permanent/auto start on boot as a demon service.
Client Setup: After you run the cloudflared tunnel the you can immedaiately
Access your node app running on 3000 port is accessible form the internet / any networks
localnode.janakkumarshrestha0.com.np
Client Setup: Configuration the SSH Client (Client Machine on any network)
On the PC you’re connecting from (your remote client or there pc on different networks), you need to install cloudflared and configure your SSH client to use it as a proxy.
Edit your SSH configuration file (on Linux/macOS, or a similar configuration on Windows tools like PuTTY).
-
Edit
~/.ssh/config:nano ~/.ssh/config -
Add SSH Configuration:
Host remote-acc-janak # Give host name you like Hostname ssh.janakkumarshrestha0.com.np # Replace with you actual host name. # The key line that uses cloudflared to proxy the connection and adjust path if different ProxyCommand /usr/local/bin/cloudflared access ssh --hostname %h # Replace with the username on the local server / host machine. User jack # (Optional) Use a specific port if your server isn't on default port, otherwise, this line isn't necessary # Port 22- The
ProxyCommandtells the SSH client to route the connection throughcloudflared, which handles the tunnel authentication.
Note: Make sure the path to cloudflared (
/usr/local/bin/cloudflared) is correct for your client machine’s installation. Check using this commandwhich cloudflaredand match. - The
-
Connect via SSH
You can now connect to your local PC from anywhere on the internet using the simplified SSH command from the client machine:
ssh remote-acc-janak
# or
ssh -vvv remote-acc-janak # for more details- The first time, you may be prompted to authenticate with Cloudflare Access (e.g., a browser login). After that, you will be prompted for your local PC’s SSH password or key.

Client Setup: SSH connect directly using a single command without having to rely on the configuration block in your ~/.ssh/config file.
To connect directly while still using the Cloudflare Tunnel as a proxy, you need to embed the ProxyCommand directly into the ssh command using the -o (Option) flag.
Here is the format you would use:
ssh jack@ssh.janakkumarshrestha0.com.np \
-o ProxyCommand="/usr/local/bin/cloudflared access ssh --hostname %h"- Breakdown of the Command
| Part of Command | Purpose |
|---|---|
ssh jack@... | Specifies the user (jack) and the destination host (ssh.janakkumarshrestha0.com.np). |
-o ProxyCommand="..." | The -o flag overrides or sets an option usually found in ~/.ssh/config. |
"/usr/local/bin/cloudflared access ssh --hostname %h" | This is the command that initiates the tunnel connection. |
%h | This is a placeholder that is replaced by the actual hostname (ssh.janakkumarshrestha0.com.np) at runtime. |
- Alternative: Simplify the Command
If you want to make this long command easier to type repeatedly without using your ~/.ssh/config file, you could create a shell alias in your shell startup file (~/.bashrc or ~/.zshrc):
- Run this command to add alias and reload
.bashrc
echo "alias remote-acc='ssh jack@ssh.janakkumarshrestha0.com.np -o ProxyCommand=\"/usr/local/bin/cloudflared access ssh --hostname %h\"'" >> ~/.bashrc && source ~/.bashrcNow, you could simply type:
remote-accClient Setup: Stronger Authentication (SSH Keys)
Relying on a password is less secure than using SSH keys. Since your SSH server is now running, you should configure key-based authentication.
On the Client Machine (Your Laptop):
-
Generate a new SSH key pair (if you don’t already have one):
ssh-keygen -t ed25519 -
Copy the public key to your remote server:
ssh-copy-id remote-acc-janakThis command will prompt for your Local host/server password one last time and then insert your public key (
~/.ssh/id_ed25519.pub) into the~/.ssh/authorized_keysfile on the remote server / local host.
After this, when you run ssh remote-acc-janak, you will no longer be asked for a password, as your secure SSH key will handle the final authentication step automatically.
Server Setup: Disabling Password-Based SSH Login
You need to edit the configuration file for the SSH server (sshd) on your host machine.
sudo nano /etc/ssh/sshd_config- Modify the Authentication Directives
Scroll through the file (or use Ctrl+W to search) and ensure the following two directives are set exactly as shown below. Make sure to uncomment the lines (remove the # symbol) if they are commented out.
| Directive | Value | Purpose |
|---|---|---|
PasswordAuthentication | no | This is the main directive that blocks all password logins. |
PubkeyAuthentication | yes | This ensures SSH key-based login remains active (it’s usually yes by default). |
- Restart the SSH Service
sudo systemctl restart ssh-
Confirm Security Settings On your Local PC (the Host/Server): Verify password authentication is disabled
grep -E 'PasswordAuthentication|PubkeyAuthentication' /etc/ssh/sshd_config- Expected Output:
PubkeyAuthentication yes
PasswordAuthentication no
- Expected Output:
Server Setup: Prepare your host Deskop for remote desktop (RDP)
This configuration is for Debian 13 on KDE/Plasma environments.
-
Create/Edit
~/.xsession:nano ~/.xsession -
Add the KDE/Plasma startup command:
#!/bin/sh # Explicitly start the KDE Plasma session exec /usr/bin/startplasma-x11 -
Make it Executable: This is essential for the script to run.
chmod +x ~/.xsession -
Restart xRDP Service: Apply the session changes.
sudo systemctl restart xrdpThe RDP client will connect to xrdp, which will run startwm.sh. The startwm.sh script will then execute /etc/X11/Xsession, which, in turn, reads your new executable ~/.xsession file and correctly launches the KDE Plasma desktop. This is the cleaner, multi-user way to configure sessions on many Linux distributions.
Client Setup: Run the Cloudflared Client in TCP Mode - for linux
You need to run a separate cloudflared command on the client machine that listens on a local port (e.g., 33389), performs the Cloudflare Access handshake, and forwards all traffic to your tunnel hostname.
Note: Same user account can’t access form 2 devices, sp make 2 or more account
-
Open a New Terminal on your Client Machine.
-
Run the RDP Proxy Command: On the Client Machine (Keep this terminal open)
/usr/local/bin/cloudflared access tcp --hostname desktop.janakkumarshrestha0.com.np --url 127.0.0.1:33389access tcp: Tellscloudflaredto act as a TCP proxy client.--hostname: Specifies the remote hostname to connect to (your tunnel endpoint).--url 127.0.0.1:33389: Tellscloudflaredto listen on your local machine at port33389and forward any traffic it receives.
Client Setup: Connect the RDP Client
Once the browser authentication is complete, your local proxy is running!
- Open your RDP Client (e.g., Remmina and KRDC).
- Connect to the local proxy address:
- Host/IP:
127.0.0.1(orlocalhost) - Port:
33389(The local port specified in thecloudflaredcommand)
- Host/IP:
Your RDP client connects locally to 33389, cloudflared forwards the traffic securely through the tunnel, and you should see the RDP login screen for your host machine.
- Enter your login credential: username and password

Client Setup: If you are Windows OS user:
Phase 1: Windows Client Setup
1. Install Cloudflared on Windows
You need the cloudflared client on your Windows machine to handle the secure tunneling and Cloudflare Access authentication.
- Download: Download the latest
cloudflaredexecutable file from Cloudflare Download page - Rename & Place: Rename the downloaded file to just
cloudflared.exeand place it in a simple location, likeC:\Cloudflared\. - Add to Path (Optional but Recommended): Add
C:\Cloudflaredto your Windows System Environment Variables PATH so you can run the command from any terminal (PowerShell or Command Prompt).
Phase 2: SSH Access (Using PowerShell/CMD)
For SSH, you’ll use the built-in OpenSSH Client in Windows (or PuTTY/Git Bash).
2. Run the SSH Command
Since Windows SSH clients don’t use the simple ~/.ssh/config file in the same way, you must include the ProxyCommand directly in your terminal, or use a tool like Git Bash which supports the Linux-style configuration.
In PowerShell or Command Prompt: Run this command to SSH:
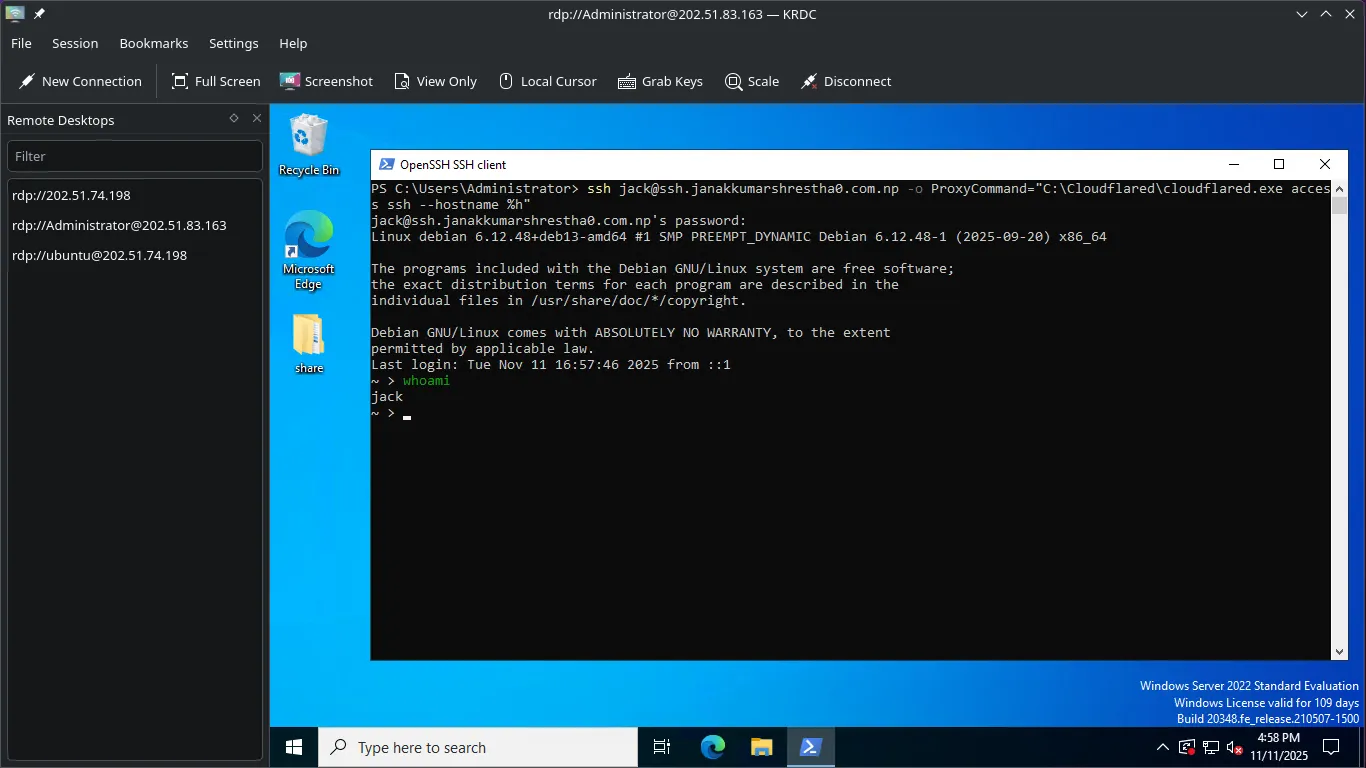
ssh jack@ssh.janakkumarshrestha0.com.np -o ProxyCommand="C:\Cloudflared\cloudflared.exe access ssh --hostname %h"Connection Flow:
- The command runs, executing the
ProxyCommand. - A browser window opens, prompting you to log in for Cloudflare Access authentication.
- Once authenticated, the terminal prompts you to accept the host key, and then logs you in using your SSH Key (if previously set up).
Phase 3: RDP Access (Using Remote Desktop Client)
For RDP, you must use the same local proxy method used on your Linux client, as the RDP client cannot run the authentication command itself.
3. Start the Cloudflared RDP Proxy
You need to run the cloudflared command in a separate, dedicated terminal window on your Windows machine.
-
Open PowerShell/Command Prompt (as a normal user).
-
Run the RDP Proxy Command: Keep this terminal window open for the entire session.
C:\Cloudflared\cloudflared.exe access tcp --hostname desktop.janakkumarshrestha0.com.np --url 127.0.0.1:33389This command will prompt for Cloudflare Access authentication in a browser.
4. Connect with Microsoft Remote Desktop
- Open the Microsoft Remote Desktop Connection (MSTSC) client (or another RDP client like Remmina).
- Connect to the local proxy address:
- Computer/Host:
127.0.0.1:33389
- Computer/Host:
- Once the connection establishes, the RDP client will show the login prompt for your remote Linux host machine.

Server setup: If you want to Make the Tunnel Permanent/auto start on boot (Host Machine)
Manual Systemd Service Creation
We will create a service file that explicitly tells the operating system to run cloudflared using your user’s configuration file.
1. Stop the Foreground Tunnel (If Running)
Make sure you’ve pressed Ctrl + C in the terminal where the tunnel was running.
2. Create the Service File
You need to create a new file for the service definition.
On the Host Machine:
sudo nano /etc/systemd/system/cloudflared-remote.service3. Paste the Service Configuration
Paste the following configuration into the file. This file is configured specifically for your setup:
- It uses your username (
jack). - It points directly to your configuration file (
/home/jack/.cloudflared/config.yml). - It uses the correct tunnel name (
remote-acc).
[Unit]
Description=Cloudflare Tunnel Remote Access Service
After=network.target

[Service]
# CRITICAL: Set the user and group to run the tunnel as.
# This MUST be the user who ran 'cloudflared tunnel login' (e.g., 'jack').
User=jack
Group=jack

# The main executable. Replace it 'remote-ssh' your tunnel name.
ExecStart=/usr/local/bin/cloudflared tunnel run remote-ssh

# Ensure the service restarts if it fails
Restart=always

# Point the service to the config.yml file located in the user's home directory.
Environment="CLOUDFLARED_OPTS=--config /home/jack/.cloudflared/config.yml"

# Give up waiting if shutdown takes too long
TimeoutStopSec=5

[Install]
WantedBy=multi-user.target
Note: Make sure to verify the username jack is correct.
Save the file and exit the editor.
4. Manage the cloudflared-remote Service
Now, tell systemd about the new service file, enable it for boot, and start it.
On the Host Machine:
# Reload the systemd manager configuration
sudo systemctl daemon-reload

# Start the tunnel service
sudo systemctl start cloudflared-remote.service

# Check the status
sudo systemctl status cloudflared-remote.service

# Enable the service to start automatically on boot
sudo systemctl enable cloudflared-remote.service

# Stop the tunnel service
sudo systemctl stop cloudflared-remote.service

# Disable this service on startup
sudo systemctl disable cloudflared-remote.service
You should see “Active: active (running)”. You can now close your host terminal, and the tunnel will remain active.
Cloudflare setup: Apply Zero Trust Access Policies
You must secure both new hostnames in your Cloudflare Zero Trust Dashboard $\to$ Access $\to$ Applications, creating a separate Self-hosted Application for:
ssh.janakkumarshrestha0.com.npdesktop.janakkumarshrestha0.com.nplocalnode.janakkumarshrestha0.com.np
For both, set the Access Policy to Allow only your verified Email Address.